Showing posts with label nrf24l01. Show all posts

Thursday

nRF24l01 radios: Long Term Stability Issues & Error Handling Enhancements

 nRF24l01 radios: Long Term Stability Issues & Error Handling Enhancements

 Creating robust, reliable networks

 We recently identified and addressed some long-term reliability issues affecting the RF24 radio library for nRF24l01 radios. The issues affect any users that make use of the write() or txStandBy() functions of the library. About a year ago, we found some issues with the radios returning "impossible" values, with one register indicating a payload is available, another saying there is not, and another saying the payload length is 0. This and similar issues appear to have affected the radio in transmitting mode as well, a fact we missed upon initial review of the previous issue. Now, a year later, we've addressed issues affecting transmission as well.


As of this writing, we are just completing testing and the changes have been pushed to the master branch of RF24. A new release should be available in a few days (version higher than 1.5.0) for the Arduino and PlatformIO platforms. For now, users can install from ZIP or clone the RF24 repo directly from the master branch.

This should be the final fix for stability in the RF24 platform, as we seem to have identified and implemented handling for all failure modes now.
 

Recreating nRF24 greater than 32 byte payload issue with nRF52840

 Recreating nRF24 greater than 32-byte payload issue with nRF52840

A D.O.S. attack against nRF24L01P that do not validate Dynamic Payload Sizes

 I made a video demonstrating how to send 33 byte payloads to the nRF24L01P and either cause the device to flush its RX buffer, or create a denial of service attack for any devices that do not validate Dynamic Payload sizes.


I find it interesting that the nRF24L01P devices accept these payloads at all, as well as sending an ACK to the transmitting device.


Wednesday

NRF52840 to NRF24L01+ Wireless Communication with Arduino

 NRF52840 to NRF24L01+ Wireless Communication with Arduino

More on development of the nrf_to_nrf radio driver

So I've finally made some more progress on the development of the nrf_to_nrf radio driver that allows communication between NRF52840 and NRF24L01+ devices. The main and latest development is the functionality of using static payloads. I'd been playing around here and there for a few months trying to figure out why the ACKs kept getting rejected when using static payloads, since I had the driver working with dynamic payloads and even ACK payloads. It turns out the NRF24 devices will only send and receive ACK packets that have a payload size of 0 when using static payloads. The driver actually needs to set the payload size to 0 then switch back after sending/receiving ACKs. I should have guessed, but didn't figure it out for quite a while.

It's been quite interesting so far, this radio will handle payloads up to 127-bytes compared to the 32-bytes of the NRF24, and supports 8 'pipes' (for addressing) rather than 6. It still has a similar method of addressing, which many people seem to find confusing. It also can measure the RSSI and return a value rather than the NRF24 functionality of returning on any value better than -64 dBm. 

The main "downfall" is that the radio is software driven, unlike the NRF24, which handles a lot of functionality independent of the MCU, but that downfall on the other hand gives us direct access to the radio and its functionality. This opens things up a bit for what is possible with the radio. In order to achieve functionality similar to the NRF24 however, interrupts need to be used to handle radio events in the background, while the main software runs. This may prove to be something I'm not going to support, but will see how things develop with the Arduino platform and NRF52 board support.

Another interesting capability of this device is encryption. It contains a CCM - AES CCM mode encryption peripheral, that allows us to create encrypted and authenticated networks. I've been playing around with this functionality lately, and it looks like it can be incorporated into the library in a fairly seamless way. More on this later...

The library is currently available via the Arduino Library Manager, PlatformIO or you can grab it at GitHub if you want the latest modifications.


Saturday

XIAO BLE Sense: More with nrf24L01+ communication

 XIAO BLE Sense: More with nrf24L01+ communication

Emulating the Enhanced Shock-Burst Protocol

So its been a little while since I received a BLE Sense board based on the NRF52840 from https://www.seeedstudio.com/ and man oh man it has taken up a lot of my time. This is one of my favorite hobbies, so creating a library for ESB communication with nrf24 modules has been quite a lot of fun!

The radio works with logical pipes and defined radio addresses, just like the NRF24L01 and interaction with it is not as complicated as it could be. Getting the ESB protocol working has been a bit tougher than I originally thought it would be though.


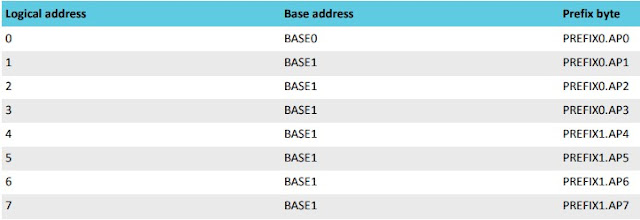
As shown in the image above, pipe or logical address 0 can have a unique address, but pipes 1 through 7 must share a base address, very similar to the 24l01.


It seems that the radio must be disabled when switching between TX and RX states, it took me a while to figure this out programmatically, until I noticed this in the datasheet. 

Interestingly enough, the new, enhanced RF52840 does not implement any internal protocols, ESB must be entirely handled via software.

I have my nrf_to_nrf radio driver up and working now with many radio features. It allows users to use the API from the RF24 library to interact with the radio. I am having problems getting static payloads to transfer correctly, but simply enabling the dynamic payload feature enables the RF24 examples to function correctly, and it works with the rest of the RF24 communication stack, the different layers will need to be updated to accept the new library.

The nrf_to_nrf library only has a single-layer buffer at the moment, but it shouldn't be too difficult to implement a 3 layer FIFO like the nrf24s have. It would be helpful if I could drive the radio via IRQs but so far I haven't had any luck with IRQ handling. My cohort in RF24 programming is working on an alternative layer that uses code from the NRF52 SDK, but we might need to have IRQ handling running for that to be a viable option. We will see, the NRF24Network and higher layers have had adjustments made to allow the new library to work. Users can manually install from source until a new release is made to the libraries, which will update via the Arduino Library Manager.

Thanks again to Seeed Studio for sending me this device, new hardware is always fun to play with!

Sunday

XIAO BLE SENSE: nrf52840 radio communication with nrf24L01+

XIAO BLE SENSE: nrf52840 radio communication with nrf24L01+

Establishing a communication layer using the RF24 API 

I recently received an XIAO BLE Sense board from https://www.seeedstudio.com/ based on the nrf52840 and have been playing around with it for a few days now. In that time I have been able to get audio recording working with my AutoAnalogAudio library, as well as establish basic radio communication with the nrf24l01+ modules. This thing is pretty sweet! It is very small, so I've been leaving it connected to the USB cable so I don't lose it, but its definitely a benefit.

One of the first things to know about this board is that it has a DFU functionality, so it switches ports while uploading, and goes back to the original port after uploading. This means that if you upload some code that crashes the device, you need to press the reset button twice quickly, and it will reaload into DFU mode on a different port, so you can re-upload some working code.

Secondly, if you get an error 'Property 'upload.tool.' is undefined' then you just need to select the correct upload port.

It also uses a USB-C connector, so make sure to have the correct cable handy.

Radio Communication:

To get radio communication working, I've written an Arduino library for the nrf52840 which can be found here: https://github.com/TMRh20/nrf_to_nrf It can be installed just like any other Arduino library.

The library includes one example for now, gettingStarted. To get this example working with the Arduino example from the RF24 library, the following parameters need to be set in the RF24 example:

  1. Call radio.enableDynamicPayloads();
As of this writing, the library only supports reception, and there is no Auto-Ack functionality yet. This is just a preliminary draft of the API.

So far I am very intrigued with this device and its capabilities. Hopefully it isn't too much to get transmission and auto-ack working, but we will see I guess.


Thursday

New Raspberry Pi + nRF24L01+ shields

 New Raspberry Pi + nRF24L01+ shields

Connect PA+LNA modules to your Raspberry Pi

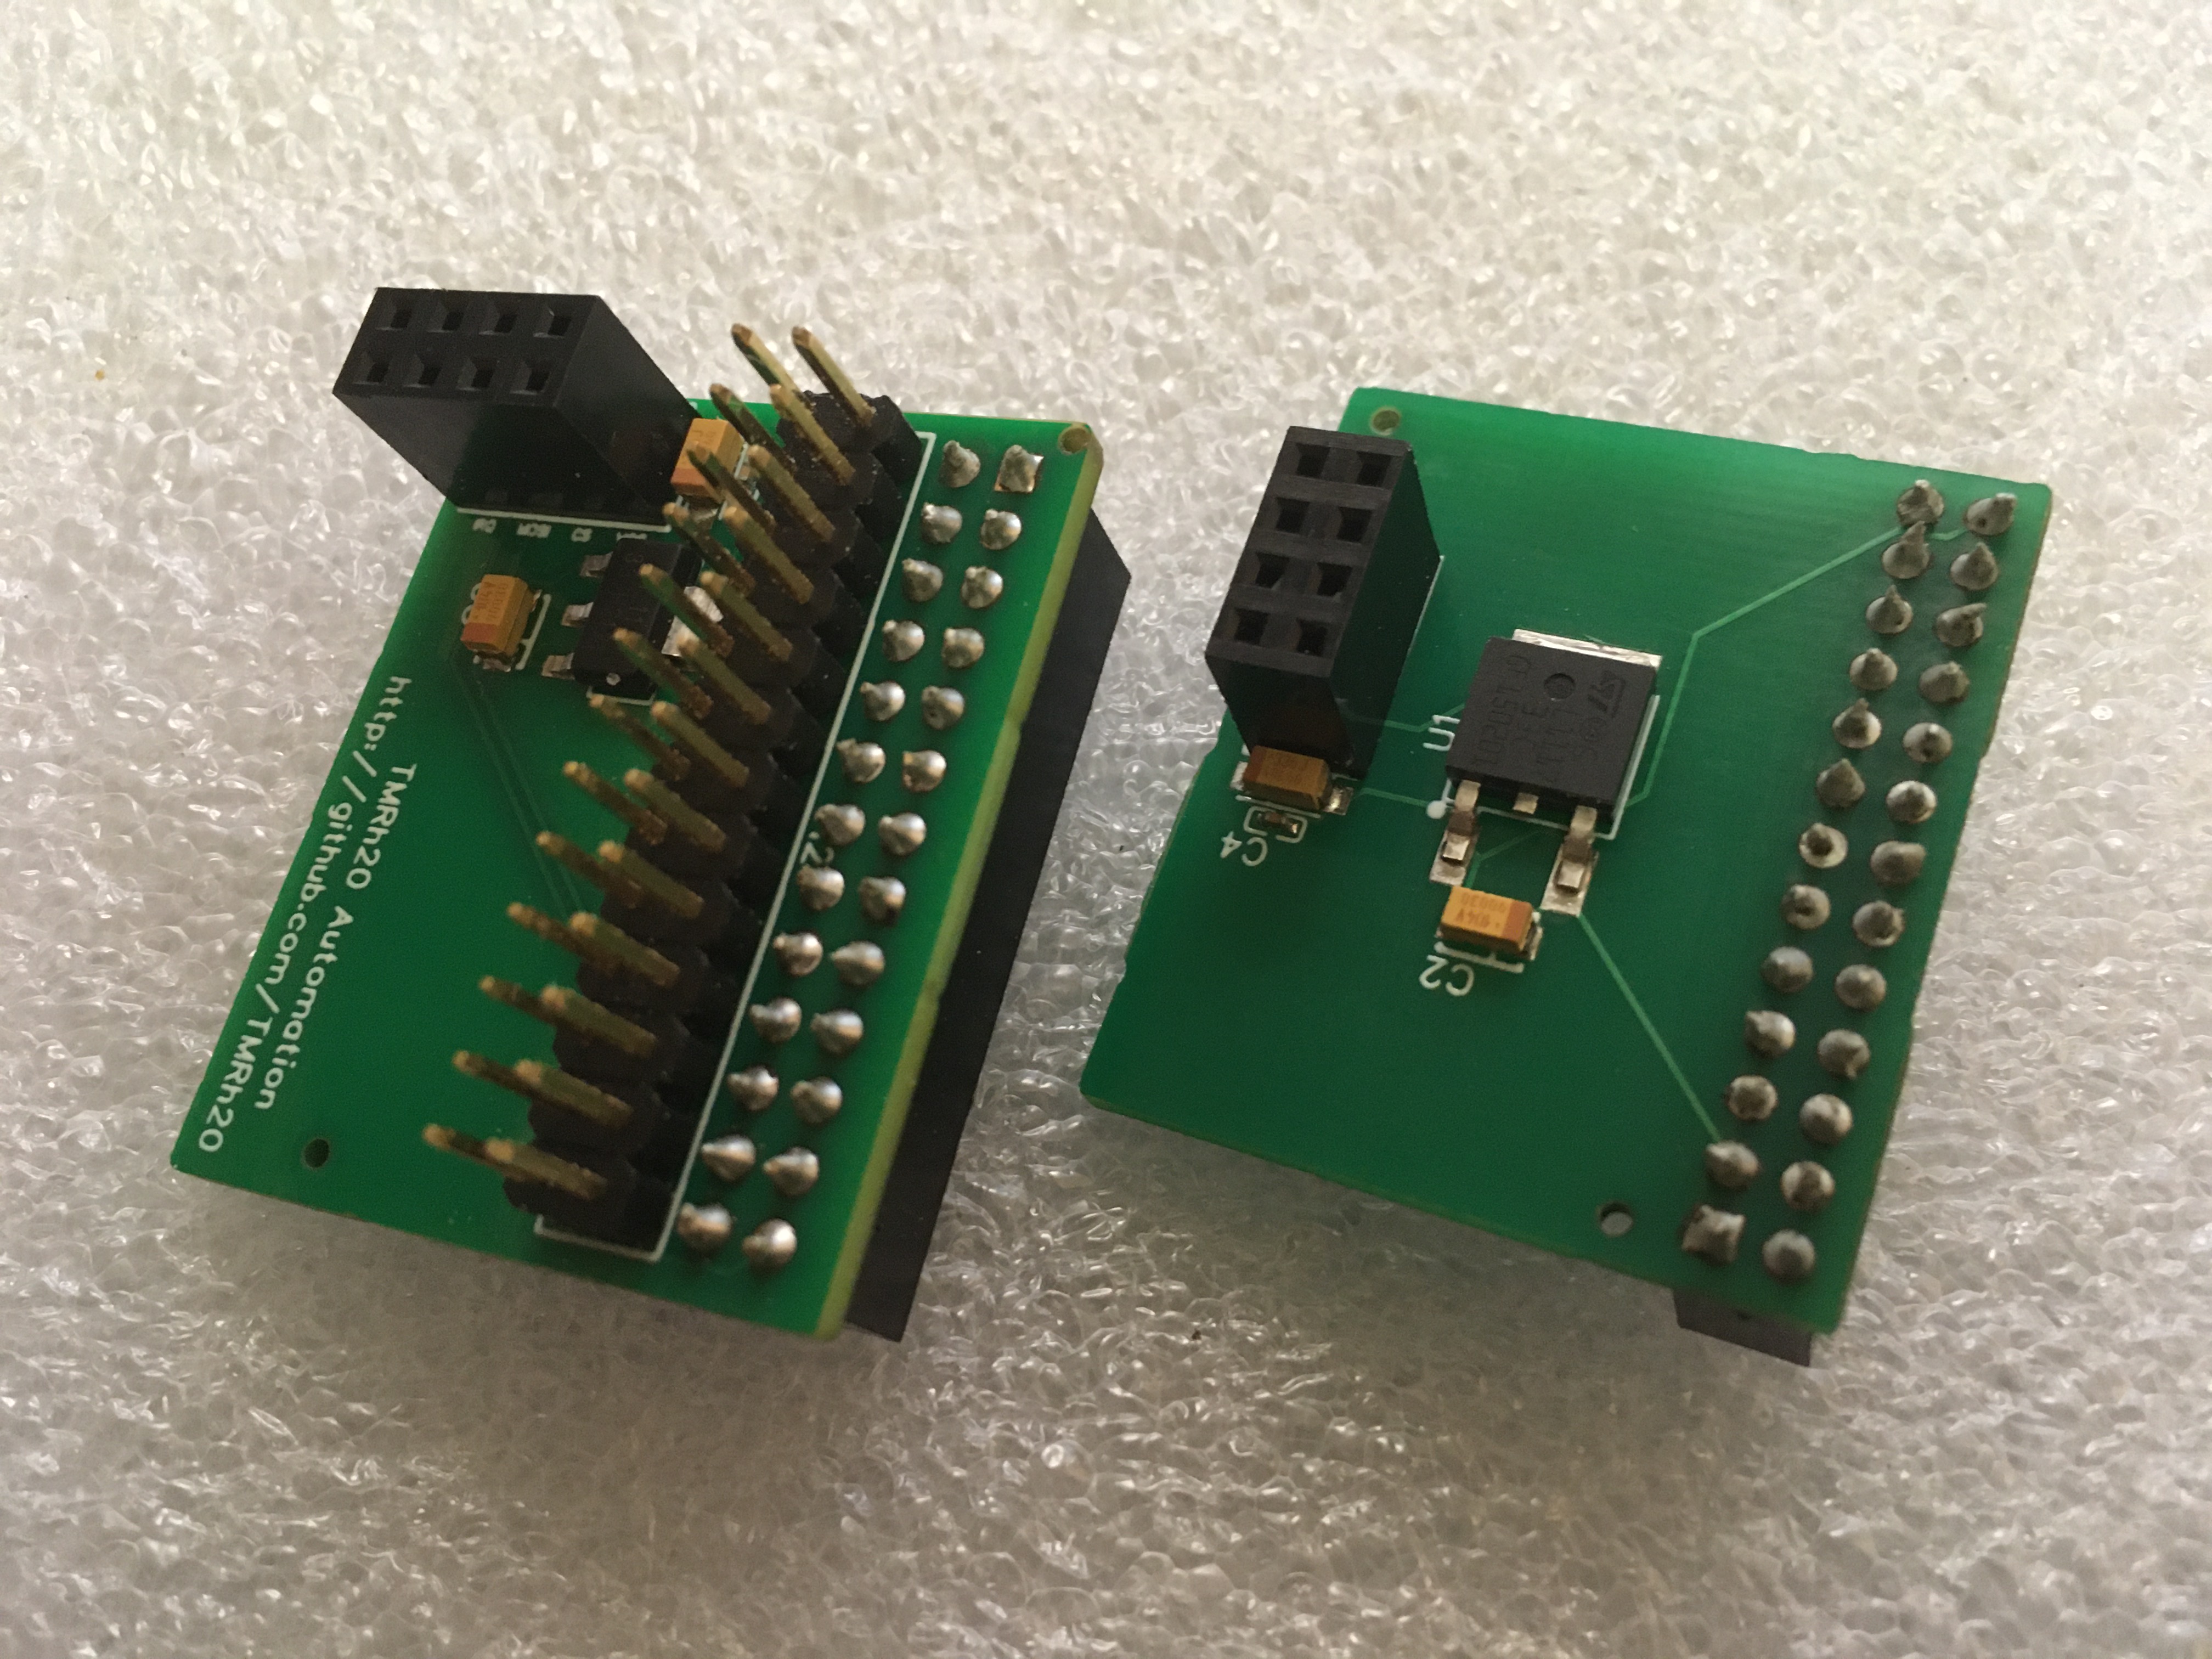
I recently had some circuit boards made, as I have had enough experience working with nrf24l01 radio modules that I've encountered numerous issues regarding power supplies and the need for additional capacitors soldered to the radios. 

These boards connect to the 5v pins of the Raspberry Pi, which can supply plenty of current for the radios, and converts it down to 3.3v. I've designed two boards, one that fits inside the case, and the other that fits outside the case, so they should work with most cases, though some cases may need modifications. The designs both use a 26-pin header, so they are compatible with earlier versions of Raspberry Pi as well.

Raspberry Pi - nRF24L01+ adapters

These adapters will support even the PA+LNA versions of the radios, so you can extend the range of your wireless networks considerably over the standard modules. They include extra capacitance, with capacitors placed right beside the VCC and GND pins of the radios, so there is no need to solder on additional capacitors.

Shields are available at https://tmrautomation.myshopify.com/

Wednesday

RF24 Home Automation Kits now Available

 RF24 Home Automation Kits now Available

Comes with preconfigured devices, just plug and play!

I've finally decided to put together some electronics kits with preconfigured devices, using the RF24 communication stack. As the system is now very stable and reliable, I think it is about time I started putting devices together and selling them to support future development and designs. 

So with that, I am announcing the opening of my online store at https://tmrautomation.myshopify.com

The current kit will come with a RPi4B and all the attachments like HDMI cable, a case, and power supply along with 3 Arduino Uno R3, 2 temperature & humidity sensors and 1 RBG LED ring, plus of course the RF24 radios. I've also designed some custom PCB shields for everything to just plug into, with power for the radios and extra capacitors, so its super simple to put it all together.

The setup uses Node-Red and RF24Gateway to provide a mesh network that seamlessly links all your devices together, and allows you to add custom devices to the network and/or expand the network by purchasing more devices or setting them up yourself with the Arduino platform.

If they sell, I intend to design more devices to go with the currently available products.

Support is available at https://github.com/TMRh20/RF24-Automation-Systems/wiki

General documentation is available at: https://github.com/nRF24 and more documentation is being created to specifically support the kits.

Monday

The RF24 Communication Stack: What are the different layers and which one do I use?

 The RF24 Communication Stack:

What are the different layers and which one do I use?

Over the past number of years, I've been developing a communication stack for nrf24l01+ radios, generally to be used with Arduino and Raspberry Pi devices. The comm. stack is organized into separate layers, per the OSI model, which allows users to establish communication between any number of devices depending on their needs.


1. The RF24 layer: This layer is generally used for simple device-to-device communication, where speed and simplicity are key. One example is for radio control of a single device, where a stream of small data packets are communicated from one device directly to another in rapid succession. Streaming of audio in real-time is another example where the RF24 layer would be used directly. Using the RF24 layer can be a bit complex, and some knowledge of radio communication is beneficial.

2. The RF24Network layer: This layer expands on the RF24 layer by providing a number of features, both to enhance radio communication and provide users with the features of an OSI layer 3 (network) layer. RF24Network nodes are arranged in a static tree topology, and this layer provides all the features to manage them. RF24Network handles routing, fragmentation/reassembly of large packets, and communication to any other device is straight-forward. Users don't require knowledge of the RF24 layer to operate a network of nodes at the RF24Network layer, and it can be much simpler than using the RF24 layer directly. Recommended when not able to use the RF24Mesh library, when there is a need for static nodes, or to simplify one-to-one communication.

3. The RF24Mesh layer: This layer expands on all underlying layers by providing an automated, self-healing network that allows nodes to move around and or re-establish connectivity as required. This layer is generally recommended when creating a network of devices, as it automates addressing for RF24Network, and provides a more seamless interaction. Users generally communicate using the RF24Network API, with RF24Mesh providing address lookups and automation for the network. 

4. The RF24Ethernet/RF24Gateway layer: This layer allows communication using standard networking protocols, such as TCP, UDP, ICMP. It is generally recommended to run RF24Gateway on a Raspberry Pi as the master node, with smaller devices running RF24Ethernet. Allows very simple or very complex communication scenarios, with users requiring little to no knowledge of radio or RF24 programming APIs. 

The RF24Ethernet API is very similar to the Arduino Ethernet API, and RF24Gateway allows users to use standard networking tools to communicate with devices running RF24Ethernet. Recommended for communication scenarios where speed is not essential, but reliability and consistency is, such as a home automation system using MQTT and Node-Red and/or a sensor network reporting data. Users can run a wireless, Arduino based webserver, or interact with nodes using their mobile device over MQTT, HTTP, etc. 


As can be demonstrated, each layer has its place, providing communication capabilities for a very wide range of scenarios, and allowing users to benefit from the built-in features or to dig right in and customize things to the nth degree. Generally, the higher you go up in the stack, the simpler the interaction, with complex underlying code providing the simplest and most advanced user interaction.


Related Code and Documentation:

https://github.com/nRF24/


Sunday

Sensors & IoT Stuff: Home Automation with NodeRed, RF24Ethernet/RF24Gateway & MQTT

Sensors & IoT Stuff: Home Automation with NodeRed, RF24Ethernet/RF24Gateway & MQTT 

Control a homemade, Arduino-based RGB light, other devices or display data using NodeRed


I made a video demonstrating how to configure NodeRed with RF24Ethernet/RF24Gateway to control a homemade, Arduino-based RGB light. The process is fairly straightforward, with the Arduino node subscribing to the MQTT server, and the NodeRed device publishing some RGB values. The same system can be used to send or receive data from a wide range of devices, thus enabling an nrf24l01 based home automation/IoT and/or monitoring system.

The video assumes users are already somewhat familiar with the RF24 communication stack, having the radios installed and ready to go. The sketch used in the video is very closely based on the existing RF24Ethernet MQTT examples, with some extra code to control some NeoPixel based lighting.

Note: As of mosquitto 2.0 you need to add  listener 1883 and  allow_anonymous true in /etc/mosquitto/mosquitto.conf.

With this setup, users can add simple input/output toggles, sliders and charts to manage devices and display incoming sensor data. It is just a matter of configuring the Arduino devices to handle the input/output messages to and from MQTT. NodeRed can also log incoming MQTT data to a database, to store and display historical data.

This system has the benefit of requiring no apps, so everything can be controlled from a mobile device or PC etc. with some simple button clicks. Everything used is also completely open-source and free, so setup costs are minimal, and there is a host of information available for Arduino and Raspberry Pi.


RF24Gateway - Creating Hybrid IoT Networks using TCP/IP and RF24Network

 RF24Gateway User Interface Example


RF24Gateway is a new complimentary library to RF24Ethernet, designed for RPi and Linux based devices with SPI and GPIO capabilities (BBB, Intel Edison, Galileo, etc).

The RF24Gateway library acts as a network/internet gateway, and allows Arduino/AVR based sensor nodes to interact with each other, the environment, and the world using TCP/IP and/or lower level RF24Network messages.

In short, it allows hybrid IoT networks to be created using Arduino and nrf24l01 modules. Some nodes are capable of internet or local network communication using standard protocols (TCP/IP) and/or RF24Network messages, while other nodes can communicate only at the network level, using only the lower layer RF24Network messaging.

Once RF24Gateway is configured, nodes can be controlled completely using standardized tools and protocols. Additional client examples have been added to demonstrate how to control and/or receive information from sensor nodes using standard tools and scripting methods via Bash, NodeJS and Python scripts. Any method of establishing a TCP connection can be used, with the examples generally using HTTP to some degree as well.

Libraries and code that utilizes RF24Network can utilize RF24Gateway in much the same way, since external data types (TCP/IP) are handled out of sight from the user. RF24Network is used exactly the same way, except that the gateway.update() function is called instead of network.update() or mesh.update(). The included examples demonstrate usage.

Note: RF24Gateway defaults to using a TUN interface with RF24Mesh enabled. RF24Ethernet examples have been updated to accommodate this.

Current Status:

April 2015: Near completion. Integrated fully with RF24Ethernet. Graphical (NCurses) interface example finalized.

Source Code:
https://github.com/TMRh20/RF24Gateway

Documentation:
http://nrf24.github.io/RF24Gateway

Download (See documentation for installation info):
https://github.com/TMRh20/RF24Gateway/archive/master.zip

Wednesday

RF24Ethernet - For DIY Internet of Things and Home Sensor Networks
Adding internet connectivity to RF24Networks using nrf24l01+ modules as ethernet cards

RF24Ethernet, What is it and how does it work?

For anybody not familiar with my blog, I have done a lot of recent work in improving the radio driver and related network library for NRF24L01+ radio modules, using Arduino and Raspberry Pi or using two or more Arduinos. These very inexpensive and feature-rich devices can be used to create your own home sensor network, with very little cost when compared to most available solutions.

RF24Ethernet will allow you to use a Raspberry Pi or Arduino as the 'gateway' machine to your network, and lets you connect to your sensors directly, using any device that has a web-browser, whether it is an iPod, PC, etc. or your sensors can connect out to the internet for information.

Current Libraries:
RF24 - OSI Layer 2 radio driver for nrf24l01+ modules
RF24Network - OSI Layer 3 network driver for RF24
RF24Ethernet - OSI Layer 4 Protocol (TCP/IP) driver for RF24Network
RF24Mesh - Mesh networking layer for RF24Network (Dynamic config and topology)

How it works: (Updated)

The RF24Ethernet library is currently in the testing phase, and uses the UIP TCP/IP stack.
The library has been modelled after the Arduino Ethernet library, allowing users to create web enabled, wireless devices, without having to learn the RF24 or RF24Network APIs. The addition of a real protocol (TCP) on top of RF24Network provides a level of simplicity, consistency and reliability beyond what was previously possible.

The IP address of each node needs to be statically assigned. Translation between RF24/RF24Network (MAC) addresses and IP addresses is handled in one of two ways, depending on the configuration. The default configuration uses ARP requests to find the correct node when TCP data is incoming, and users can optionally utilize RF24Mesh to provide MAC/IP translation and/or dynamic address assignment at the network layer.

Configuration/Testing: (Updated)

Configuration is now integrated directly into RF24Ethernet, with the RF24Network address specified as the MAC address, and this can be further automated by utilizing the RF24Mesh layer along with RF24Ethernet. Users have the option of creating a static network, or utilizing RF24Mesh to create a dynamic network with nodes capable of moving around physically or utilizing fail-over nodes. The RF24toTUN application running on a Raspberry Pi automatically performs discovery and routing for incoming TCP/IP data, so users only have to configure static IP addresses, and a unique identifier for each node when used with RF24Mesh.

Setup (Arduino & RPi):
 RPi:
  Install RF24, RF24Network, RF24Mesh & RF24toTUN libraries
  Note: RF24toTUN requires the boost libraries. Run sudo apt-get install libboost1.50-all 
  a: wget http://tmrh20.github.io/RF24Installer/RPi/install.sh
  b: chmod +x install.sh
  c: ./install.sh  (Note: This should be run without sudo or all your base files will belong to root)
Arduino:
 a:  Install RF24 lib
  c: Install RF24Ethernet library
  d: If using with a RPi, run any of the Getting_Started examples. You should be able to ping and connect to the remote Arduino.
  e: If using with a SLIP interface (non-RPi) :
      1. Run the  SLIP_Gateway.ino example on the Arduino connected to the PC/MAC etc
      2. Run the SLIP_InteractiveServer.ino example on another Arduino.
      3. Once the SLIP interface is configured as per the examples, you should be able to ping and connect to the remote Arduino.


 RF24Ethernet - Setup, config and demo
The initial proof of concept interface borrowed directly from the SerialIP library, using the uIP TCP/IP stack and uIP proto-sockets/proto-threads. Since testing was very succesful, the library has been developed to provide a simpler user interface, very similar to the Arduino Ethernet library. In its current form, a node running RF24Ethernet can act as a standard TCP server, and can function as a telnet or web server, by modifying the included example.

How can this be used?

The possibilities from here are virtually endless, with very inexpensive sensor networks being provided with direct TCP/IP connectivity. One of the more obvious applications involves simple retrieval of information from network or internet sources, such as the time or the current weather. Controlling a connected LED or other attached device can be as simple as opening a bookmark in your browser.
 
To take things a whole lot further, this could even allow RF24Network to be utilized as a bridge betwen LANs, using sensor networks for emergency commuinications etc, when main connections are down. Testing shows that speeds  across the network are slightly better than or equivalent to a dial-up connection, so it seems to provide a practical solution for low-speed data transfers like sensor data, text-based email or chat.

Results of Testing:

The above picture presents an idea of the latency, etc when sending ping requests of varying sizes from the RPi master node to a connected sensor node.

Documentation/Further Development?
See http://tmrh20.github.io/RF24Ethernet for available documentation.

Update Nov24:
Working with UIP TCP/IP stack has been a bit of a challenge to say the least, but things seem to be coming along nicely. The RF24toTUN library has been updated to route payloads according to the radio MAC address, so integration with RF24Network is coming along nicely. Support for the RPi to send fragmented multicast payloads has been added, so ARP requests are working nicely within RF24Network. This will allow full integration with RF24Mesh, to create a dynamic TCP/IP mesh sensor network if desired, with very little to no configuration needed by the user. I've commited the current code to a new branch (master_dev) to hold the new code until it is cleaned up and more functionality is added. Currently, it only supports incoming data connections as a simple server, and ICMP packets.

Update Nov30:
The Server and Client API to match the official Ethernet library is now in place and working for the most part. DHCP, DNS lookups and UDP in generall is not developed yet. There are still some bugs and oddities to work out, but overall, the TCP server and client seem to perform fairly well given the circumstances. Web client and server examples have been included.

Update Dec 7:
The library seems to be working very well now, and the API is about 95% complete. Most bugs have been addressed, with only a few minor issues left, generally surrounding timeouts during very large data transfers. The existing examples have been updated, and some new examples have been added, demonstrating a simple web server and interaction with a sensor node via a web browser. Some documentation has also been created and is linked below.

Update Dec9:
RF24Mesh has been integrated with RF24toTUN, to provide automated addressing and mesh support for RF24Ethernet. When building RF24toTUN, use 'sudo make install MESH=1' to compile with RF24Mesh support. If using with RF24Ethernet, see the new SimpleServer_Mesh.ino example for usage. An install script has also been created for RPi, to simplify installation of the various libraries.

Update Dec 14:
Updated RF24Ethernet to support SLIP or TUN devices as well. This requires RF24Mesh to perform MAC/IP translation. Two new examples have been added, SLIP_Gateway.ino demonstrates how an Arduino can act as a simple USB interface to any device that supports SLIP. SLIP_InteractiveServer demonstrates how to use RF24Ethernet and RF24Mesh with a SLIP or TUN interface.

Update Dec 28:
Modified the MAC address format due to issues with standards when using it on RPi/Linux. Modified the timing of uip restarts. Updated RF24toTUN to provide cmd line configuration for all major options including node addressing. Fixes and updates to RF24Network and RF24toTUN seem to have addressed some buggy behaviour.

Update Dec 30:
Todays latest updates should be applied along with the latest updates to RF24toTUN and RF24Network. The main change fixes corrupt client requests, which would have been noticed when establishing outgoing connections. The remaining changes revolve around reliability, the order of operations, and the timing of things, and seem to really bring RF24Ethernet closer to a stable, reliable library. 
 
Update Jan 2, 2015
This round of updates comes after a very long round of testing and coding. The RF24 library has been updated to provide even better timing, reliability and throughput. Changes to RF24Network improve fragmentation/reassembly. RF24toTUN has been updated to fully support all 3 datarates, and throughput has been improved for all speeds. RF24Ethernet has been updated to provide a timeout for connections, part of better handling for TCP window reopening and failures, and allows users to configure the periodic timer via uip-conf.h to provide faster transfers. These changes bring RF24Ethernet a lot closer to a stable release. Testing shows that these updates provide easily noticeable increases in reliability and speed at all levels, and updating all the mentioned libraries is recommended.

Update Jan 4, 2015
Added connection timeouts to recover from hangs during failed client donwloads, which adds improved reliability to the library. Added better TCP window management to prevent those hangs during client downloads, along with configuration options. Documentation updated to include new features and options.

Update Jan 16, 2015
Updated to v1.2b - Adds UDP and DNS support along with a pile of fixes and updates. Users should update RF24Network and RF24toTUN along with RF24Ethernet. This will be the final update to this blog post. See the documenation below or check back here at tmrh20.blogspot.com for additional posts.

See https://github.com/TMRh20 for all related code/library downloads, and http://nrf24.github.io/RF24Ethernet for available documentation.


Monday

RF24Network Arduino/RPi Library - A New Development

What is RF24Network?

It is a library built upon the core RF24 driver for nrf24l01 radio modules that attempts to provide a simple interface for connecting anywhere from a few, to hundreds of wireless radio modules, connected to Arduino or Raspberry Pi devices. Uses don't need to know every detail of the radio modules in order to setup and operate a network of them. The library handles configuration, addressing, interconnections, and routing, so users can focus on creating household or long distance radio sensor networks, with data being routed automatically through the network to its intended destination.

Whats New?

I've been doing quite a bit of work on the core RF24 radio driver, including a wide range of changes and updates, and wanted to test out some of the more interesting features of the modules on a large scale. The existing network layer (originally by ManiacBug) provided a great foundation to begin, as it contained all of the required features of an RF24 radio network, and used a system of routing and addressing that is well suited to small devices like Arduino or ATTiny.
  
Some of the new features may seem unnecessary or overkill, and some will probably be, but others will support scenarios just not possible in the previous configuration. I've created a development repository and associated documentation that will be kept up roughly in accordance with development, since it will all take time to test fully, but it seems to work well and some of the features are pretty interesting. 

Updated 12/14:
RF24Network now supports fragmentation for all devices, including via multicasting and is enabled for all devices except ATTiny by default. The library is fairly stable at this point, and testing is ongoing with RF24Ethernet and RF24Mesh.

Updated 10/14:
Fragmentation support was recently added for the RPi and Arduino Due. Standard AVR devices (Arduino Uno etc) are able to send large, fragmented payloads, but cannot yet reassemble them. See below to enable. Usage is exactly the same, but any very long payload lengths will be accepted.

 Routing changes have been partially reverted to use a limited number of retries (auto-ack) where possible, and function similarly to the master branch, although network ACKs are still utilized.

Some defaults have been changed:
  • Multicasting is enabled by default. This limits the number of normal child nodes/parent to 4.
  • Fragmentation is totally disabled by default on AVR devices
  • Uncomment defines in RF24Network_config.h to disable/enable these options


Fragmentation/Reassembly:

Fragmentation and reassembly support is enabled by default, with a maximum payload size of 120 bytes. Users can configure the memory buffers, or disable fragmentation by editing the config.h file. See here for the documenation. When enabled, data is sent as usual, and the network layer manages fragmenting and reassembling the data automatically.

Addressing Formats:

The development version currently uses a different addressing format, using specific addressing chosen for use in radio transmission. See the datasheet and this blog post for more information. Users simply specify an octal address (01-05) as before for example, and the radio addresses will be configured accordingly.

Routing and Acknowledgement

Previously, payloads that were routed over one or more nodes were not acknowledged, so the transmitting radio had no way of knowing if payloads were delivered. *New: In the development version, users have the ability to specify whether or not the network will respond with an ACK, simply by choosing from a range of message types. Typical user message types of  65 through 127 will be acknowledged, and message types 1 through 64 will not be acknowledged. There are a few benefits to this arrangement, since network acks can automatically help to prevent nodes from flooding the network with traffic, and no-acks can be used when a response is desired from the recipient etc.

Direct Routing and Failovers

Network frames can now be logically addressed to one node, and sent to any other node for routing. This allows some dynamic topology, and can also be used to reduce routed traffic on a network. See the documentation links below for specifics and limitations.

Multicasting

A multicasting feature has also been added that allows, for example, the master node to send out a single network payload, and have it delivered to hundreds of network nodes very rapidly. Multicast relay nodes can be used to disperse messages throughout all or partial areas of the network. Multicasting is enabled by un-commenting #define RF24NetworkMulticast in the RF24Network_config.h file, since it requires additional program space and memory.

Improved Performance

Performance on the network will be similar, but users will see a much higher error rate using the development version, as it gives a real indication of success or failure of payloads. Data throughput should be increased in most cases, due to reduced retry periods, and the new routing protocol.


Additional Technical Details and Information:

Documentation for the development version can be found here, and should be kept pretty consistent with changes. It contains information specific to the new routing and delivery protocols, as well as updated class documentation for usage. 
The development repo is found here, and it can be downloaded here. Features and functions found to be stable and beneficial are likely to be merged into the master branch eventually. The development branch should be relatively stable at any given time, but is in no way guaranteed to be.

Update:
The RF24 communication stack and documentation can be found here: https://github.com/nRF24


Sunday

Testing New RF24 Arduino Library Fork for NRF24L01 Radio Modules: Comparative Testing - Transfer Rates

Overview:

Per my previous blog posts, I have been working on some improvements to the RF24 radio library, and the main benefits of the changes have been realized. The following video compares the difference against the fork found at https://github.com/gcopeland/rf24. I did not compare against the main library since the gcopeland fork outperforms it quite a bit already.


The new library, source code and documentation can be found at https://github.com/TMRh20/RF24. Info in previous blog posts.

More to come...

Saturday

Arduino Radio/Intercom/Wireless Audio:
Streaming Audio in Real Time using Arduino and NRF24L01


  In my last blog post, I talked about using inexpensive radio modules to transmit audio at reasonable rates using only the radio modules, a microphone or input device, and an Arduino. This started out as what I thought would be a simple project, and ended up being a WAY bigger project than I thought, since it required improving the speed of the extremely well written RF24 library for the radio modules. Although there wasn't a lot of room for improvement, from my (biased) testing, some cases show performance increases up to 25% in some situations over the fastest fork I could identify.

  I think this streaming audio code would be good in library form, but for now, the sketches I am using to develop the library are posted on GitHub Here the whole sketch folder is required. The audio is only 8-bit right now, but even that is not bad. Judging by the transfer speeds, I should be able to do 10-bit audio, but the code in 8bit was just simpler to start with. To put the quality in perspective, telephone quality could be about 8khz, 12bit, 96bps data rate, while CD quality could be said to be 44.1khz, 16bit,706k Data rate. This sketch currently does 8 to 44khz+ at 8-bit, with the possibility to go to 10-bit. Depending on the sample rate and bit rate, the user can adjust the quality according to the application.

  The sketch is simple to configure for testing, just edit the user variables defined at the top of the sketch and upload. It can then be controlled by sending 'r' to start recording/sending and 's' to stop, and '=','-' to raise or lower the volume when receiving. External buttons can also be defined in the user config section to allow users to create things like intercoms or even a portable radio or wireless headset. The audio at 10-bit will not be super high quality, but should be very reasonable for voice transmission.

Recording is simply done from an analog pin, and should work with microphones etc designed for Arduino. It currently uses the 5v voltage reference for recording.

  This sketch could be easily converted to use any transmission medium that can support the streaming data at a consistent sample rate, and the library could support multiple radio devices and more advanced hardware, but that would definitely take some time. If it does end up as a library, it will of course be published on GitHub for anyone to use or modify.

The library may work ok with the standard RF24 library or current forks, but my fork has been designed specifically for these purposes, so don't forget to install it if using the data rate/sample rate combinations shown in the example. Download Lib

Update:

10-bit Audio: I comtemplated a few different ways to include the extra two bits in the transmission, and ended up putting the main 8bits of each sample in the first 25 bytes of the payload. The remaining bit-pairs are then placed into bytes 26 to 31. This seemed like the easiest way to 'encode' and thus 'decode' the data, but it does put a bit of an extra load on the MCU. The max sample rate for 10-bit audio is about 24khz, but with 32khz it will just be 9-bit.

Multicasting: The only changes required to include multicasting involved setting all the radios to listen on the same pipe by default, and setting all radios to transmit on the same pipe when transmitting. Since only one radio should be transmitting at a time, it is pretty straightforward. This also removes the need to configure radios differently. If using the same Arduino board, all the radios can be configured exactly the same unless using remote commands, which would require some code changes.


Update 2:
See https://github.com/nRF24/RF24Audio for more info. The library can be installed using the Arduino library manager.

Tuesday

 Arduino: Using the full potential of NRF24L01 radio modules
A New, Optimized Fork of the RF24 Radio Library: High speed data transfers and more!
Includes updates and new features for the RF24Network Library

Updated Jan 2015
  NRF24L01+ radio modules are very inexpensive, and provide a robust interface for transferring data wirelessly between devices with minimal resource and power consumption. I've been working with them more and more as time goes on, but have always struggled with some of the inner workings and limitations of the current libraries available.

After initially studying the operation of the radio modules and reviewing the details in the data sheet, I was convinced that the modules could perform much faster. Further research into the additional library forks, blog posts, and countless hours of testing revealed that the modules can be very sensitive to the timing of things. I also discovered a number of bugs and/or issues that would hinder performance and/or reliability. 

Initial testing proved very fruitful, with speeds maxing out the configured data-rate of the chip, and reliability was improved over previous iterations of the library. Over the course of the following year, the library has been further optimized and extended, with many new features, bug-fixes, and improved reliability and performance.

(See bottom of page for download links and documentation)

Taking Advantage of the Improvements:

From a user perspective, very little is changed from previous forks/libraries beyond the usage of the available() function. This is the main compatibility difference between this and the previous libraries. The available() function will always return 1 if data is available, to align the library with standard Arduino functions. From a technical perspective, the improvements are dramatic.

 Users will benefit from the improvements just by using the new library with old code, and some things not previously possible, can now be achieved. The included .ino examples have been configured to demonstrate 'standard' usage, but advanced users can still drive the chip outside the 'manufacturer recommended operation'

Additional functions have been added to aid in streaming or rapid-transmission situations, where 2 or more payloads are sent in rapid succession, or streamed at a high transfer rate. These include writeFast, writeBlocking, and txStandby. Use of these functions allow users to maximize throughput without overrunning the FIFO buffers. See the documentation for more info on usage. 


The addressing format has been extended to allow the use of 24,32 or 40-bit addresses, as well as defining and handling of addresses via byte arrays or integers.

For example, the following addresses are the same, and either format can be used:

uint64_t myAddress = 0x68524d5431LL;   ( Old Format   )
uint64_t myAddresses[] = { 0x68524d5431LL, 0x68524d5432LL};

byte myAddress[] = "1TMRh";                    ( New Format )
byte myAddress[] = {'1','T','M','R','h'};
byte myAddresses[][6] = {"1TMRh","2TMRh"};

Technical Info:
One of the primary factors in increasing efficiency was eliminating power ups and power downs from the general operation of the radio, which many of the existing forks already had identified. A power up takes 1.5ms or 1500us, where a transition from standby-I or standby-ii takes only 130us. In addition, leaving the CE pin high while data is written allows the possibility to have 0 delay if the TX FIFO buffer is kept busy, which this library makes use of via the writeFast() and writeBlocking() features.

This changes the operation of the radio a little bit, in that the radio needs to be powered up or powered down manually, instead of being powered down after every write.

The radio modules have shown to be very sensitive to the timing and order of operations, and many hours of testing and review have determined the optimal settings and order of operations to achieve the highest speed and reliability. Delays have been removed where possible, added where required, and minimized in every case.

As mentioned, the the available() and isAckPayloadAvailable() functions now simply check the FIFO buffer to see if a payload is available. This allowed simplification of the write() function, and should help to ensure that no packets are missed. Previous iterations used the interrupt flag, which can result in a number of issues.

The overall change in response is apparent when running example sketches like the GettingStarted_CallResponse sketch included with the library or the Transfer examples.

At this point, there are so many changes, bugfixes and details, it is best to see GitHub for all of the changes and technical info.

RF24Network: The standard RF24Network library has been updated to support the new changes, and a DEV version has implemented many new features like fragmentation/reassembly and multicast. This library is recommended if connecting any number of nodes, and provides addressing, routing, etc to help manage data in a network configuration. RF24Mesh is an overlay for RF24Network that provides automatic addrressing, and a dynamic topology for nodes running RF24Network and/or RF24Ethernet.

RF24Mesh: Automates addressing etc. for RF24Network and provides a seamless, self-healing network on top of all the layer 3 network features. 

RF24Ethernet adds a surprising level of reliability, consistency, and ease of use to nodes running RF24Network, by using standard TCP/IP networking. It uses the nrf24l01 radios as a standard Network Interface Card (NIC). It uses a Rasberry Pi or other Linux platforms as a network gateway, to allow RF24Network nodes to connect directly to web services or act as a web-server etc. Allows users to control nrf24l01 sensors or systems easily, reliably, and simply using any device with a web-browser, MQTT, etc. The API is very similar to the standard Arduino Ethernet library.

Class documentation now available here

Testing & Results:
Testing is now fully automated, with the introduction of TCP/IP support, with standard networking tools being used to test transfer speeds and reliability. Users can easily make use of the full data-rate in no-ack mode, full-duplex communication at 1MBPS with Ack-Payloads, or half-rate if using Enhanced ShockBurst (ESB). This has allowed many improvements to related libraries like RF24Network as well as the low level RF24 radio driver.

Since the initial release, many users including previous RF24 contributors have adopted the new library and provided feedback towards further improvements .See here for a demo of the initial transfer rate testing.
 
The wireless audio sketch/library that inspired these improvements is now linked below. The audio library itself is limited to around 16-20khz sample rate, which produces very reasonable sound quality for voice transmission. The limitation is due to the use of interrupts for virtually every part of the library, however, this makes it very simple to configure and use. See here for the development sketch, which was used to design the library, and is capable of higher quality audio. The wireless audio portion of the TMRpcm library has been updated to allow audio streaming and multicasting directly from SD card over RF24 modules as well.

New:
See the new store for reliable RF24 hardware and kits.

Reference Material/Libraries:

Raspberry Pi Simple Library Installer:
http://tmrh20.github.io/RF24Installer/RPi/install.sh

RF24 - Low Level Radio Driver (Generally used for device-to-device communication)
TMRh20 RF24 Fork on GitHub  - Download
RF24 Documentation 

RF24Network (Provides addressing, routing and many other features for use with multiple devices)
TMRh20 RF24Network Fork on GitHub - Download 

RF24Mesh (Dynamic 'mesh' layer for RF24Network)
RF24Mesh on GitHub - Download
Documentation

RF24Ethernet (Modelled after Arduino Ethernet API - TCP/IP over RF24Network)
RF24Ethernet on Github - Download
Documentation

RF24Audio (Digital Audio over RF24 radio modules)
RF24Audio Library

MySensors.org - Create user friendly sensor networks using RF24 radio modules

Alternative: RadioHead NRF24 Library - (Supports multiple radio devices)

NRF24L01 Data sheet
Original/Old RF24 Library by ManiacBug


Monday

TMRpcm Arduino WAV/PCM Audio Playback Library Update

This is an update to my Arduino PCM/WAV audio llibrary detailed here and in previous posts. I now have the files hosted at GitHub, and I added an optional proof-of-concept library that enables RF (wireless) audio streaming capabilities to Arduino. Currently it will support two remote devices, but can be easily modified to stream to more. Arduino Mega likely needed for RF (wireless) audio host due to compiled size.

Source: here
Library Package: here

Over-the Air (RF) PCM Playback with NRF24L01+ and Arduino

Previous posts regarding the playback of wav files from an SD card were related to another project I am working on involving NRF24L01 radio modules. Since these are capable of around 20KB/s in a real-life scenario, I thought it would be worth a shot to try sending the audio over the air. Basically, I wanted to get feedback from an Arduino operating remotely in the form of sounds, but I don't have room for an SD card locally on the controller, and I also wanted the remote Arduino itself to be able to give feedback in the form of sounds when events are triggered or commands are received, etc.

This is the sketch I have been using to work out some of the details and the bugs. Right now it is geared up to work with two 'controllers' in that if you send the letter 'g' over the serial port to the 'transmitter', it will randomly play a beep on one of the three devices and continue randomly on as fast as it will go. (audio files not included) There is also a data transfer rate test that can be enabled, so one can see exactly how fast data is flowing. It will also play a sound file over the RF link, but thats kind of boring. The sketch is being posted mainly for my own reference, because in its current form I can't do much with it, and its not really useful for anything, but it does demonstrate the capabilities and how to use them.

This RF side of this also uses improved code for PCM playback, which I will likely include in the library previously posted. The timer is run at a minimum of double the actual sample rate, so as to maximize audio quality. Low quality 8khz sample rate sounds sound much, much better this way. This is very similar to the PCM libary, so sounds can be anywhere from 8-20khz sample rate, 8-bit, Mono, but it won't handle 20khz very well, since that is basically the max transfer rate. Speaker is pin 9 on Arduino Uno,Nano, etc, and 11 on Mega.

The system works using ack-payloads and interrupts to coordinate the data transfer and simultaneous playback. What is referred to as the 'transmitter' is actually set to PRX(primary reciever) and sends sound data in the form of ACK(acknowledgement) packets, with 32bytes payload. The 'receivers' just send out commands till one is answered, and then request the data as they need it. The 'transmitter' only sends out data in response to an incoming command.

 This could theoretically work on a larger number of devices, since it only uses a single data pipe at a time with different addresses for each device, but I don't really have any use for that.Change the data pipe to [1] before uploading to a second receiver.

The SD 'Transmitter' is a big sketch, and at the moment is just a bit big for the ATMega328, and I have been testing using a Mega 2560. The receivers are tested with a Nano328. Again, these are just rough sketches, but they work fairly well at this point: 

Controller/Receiver: here

SD Transmitter: here

This is the library for the NRF24L01+ I have been using: nrf24l01  Disclaimer: I did not author this library, it was found here . I just hacked in some extra code for testing which is required for this version of the sketch, and wanted to archive it for future reference.

Streaming Audio over WiFi using the Arduino Uno R4 WiFi, AutoAnalogAudio Library & VLC

Streaming Audio over WiFi using the Arduino Uno R4 WiFi, AutoAnalogAudio Library & VLC  Pushing the system to its internal limits  With ...