Showing posts with label arduino. Show all posts

Thursday

Playing around with the Arduino Uno R4 Minima, Uno R4 Wifi and Uno Q

Playing around with the Arduino Uno R4 Minima, Uno R4 Wifi and Uno Q

Stepping up to a new level of micro-controller 


 Thanks to the fine people at Arduino, specifically Per Tillisch, an Arduino Support Engineer, I just received some free hardware! An Uno R4 Minima, Uno R4 WiFi and Uno Q!


Uno R4 Wifi and Uno R4 Minima
 
Now its just a matter of figuring out what to do with this stuff. I've already begun testing with the RF24 Communication Stack, and most of it works out-of-the-box. The only change required was adjusting the CPU speed detection in RF24Ethernet to accommodate the Uno R4 Wifi and Uno R4 Minima. I've put the changes in, but haven't done a release yet. Users can download the ZIP or clone the repo to install for now.
 
The R4 Minima appears pretty straight forward, with a micro-controller attached to a familiar board type, and a lot more processing power and memory than previous AVR-based designs. Not that the AVR boards are no longer useful, but its nice playing around with the newer designs and architecture. Newer boards actually tend to have a simpler interface when getting into direct register access and control, so its easier to develop libraries and applications that work with the newer boards. The R4 WiFi is more complex, with a main MCU, the Renesas RA4M1, and an ESP32 handling WiFi with a bridge between the MCUs.
 
Now I've played around with the Arduino Q quite a bit already, so will be mostly focusing on understanding and working with these new R4 boards that I have no experience with. I've gotten them working with the RF24 Comm stack as mentioned above, so it will probably be onto the AutoAnalogAudio library, to see what can be accomplished. The Arduino Q runs Linux along with the MCU, with a Serial bridge between them, but these boards are quite different. They seem to be more comparable to regular MCUs, just with enhanced functionality.
 
The boards themselves came with no strings attached, Arduino folks just sent them for free, so I can pretty much do whatever I want, with whatever time frame I want. 
 
Of course the big difference is that the R4 WiFi has an embedded ESP32 chip for WiFi in addition to the main micro-controller, so I will need some time to understand the bridge interface and whether it is worth it to explore programming the ESP32 chip directly. At first I will focus on the Renesas RA4M1 chip and explore its main capabilities, leaving the rest for later.
 
A big thanks to Arduino for these boards!

Monday

Installing and using the RF24 Communication stack on Arduino and RPi - 2024

 Installing and using the RF24 Communication stack on Arduino and RPi - 2024


I made a video to demonstrate current installation and usage of the RF24 comm stack on Arduino and Linux using the latest available code.

See Arduino Project Hub for a text based tutorial


Wednesday

NRF52840 to NRF24L01+ Wireless Communication with Arduino

 NRF52840 to NRF24L01+ Wireless Communication with Arduino

More on development of the nrf_to_nrf radio driver

So I've finally made some more progress on the development of the nrf_to_nrf radio driver that allows communication between NRF52840 and NRF24L01+ devices. The main and latest development is the functionality of using static payloads. I'd been playing around here and there for a few months trying to figure out why the ACKs kept getting rejected when using static payloads, since I had the driver working with dynamic payloads and even ACK payloads. It turns out the NRF24 devices will only send and receive ACK packets that have a payload size of 0 when using static payloads. The driver actually needs to set the payload size to 0 then switch back after sending/receiving ACKs. I should have guessed, but didn't figure it out for quite a while.

It's been quite interesting so far, this radio will handle payloads up to 127-bytes compared to the 32-bytes of the NRF24, and supports 8 'pipes' (for addressing) rather than 6. It still has a similar method of addressing, which many people seem to find confusing. It also can measure the RSSI and return a value rather than the NRF24 functionality of returning on any value better than -64 dBm. 

The main "downfall" is that the radio is software driven, unlike the NRF24, which handles a lot of functionality independent of the MCU, but that downfall on the other hand gives us direct access to the radio and its functionality. This opens things up a bit for what is possible with the radio. In order to achieve functionality similar to the NRF24 however, interrupts need to be used to handle radio events in the background, while the main software runs. This may prove to be something I'm not going to support, but will see how things develop with the Arduino platform and NRF52 board support.

Another interesting capability of this device is encryption. It contains a CCM - AES CCM mode encryption peripheral, that allows us to create encrypted and authenticated networks. I've been playing around with this functionality lately, and it looks like it can be incorporated into the library in a fairly seamless way. More on this later...

The library is currently available via the Arduino Library Manager, PlatformIO or you can grab it at GitHub if you want the latest modifications.


Thursday

New Raspberry Pi + nRF24L01+ shields

 New Raspberry Pi + nRF24L01+ shields

Connect PA+LNA modules to your Raspberry Pi

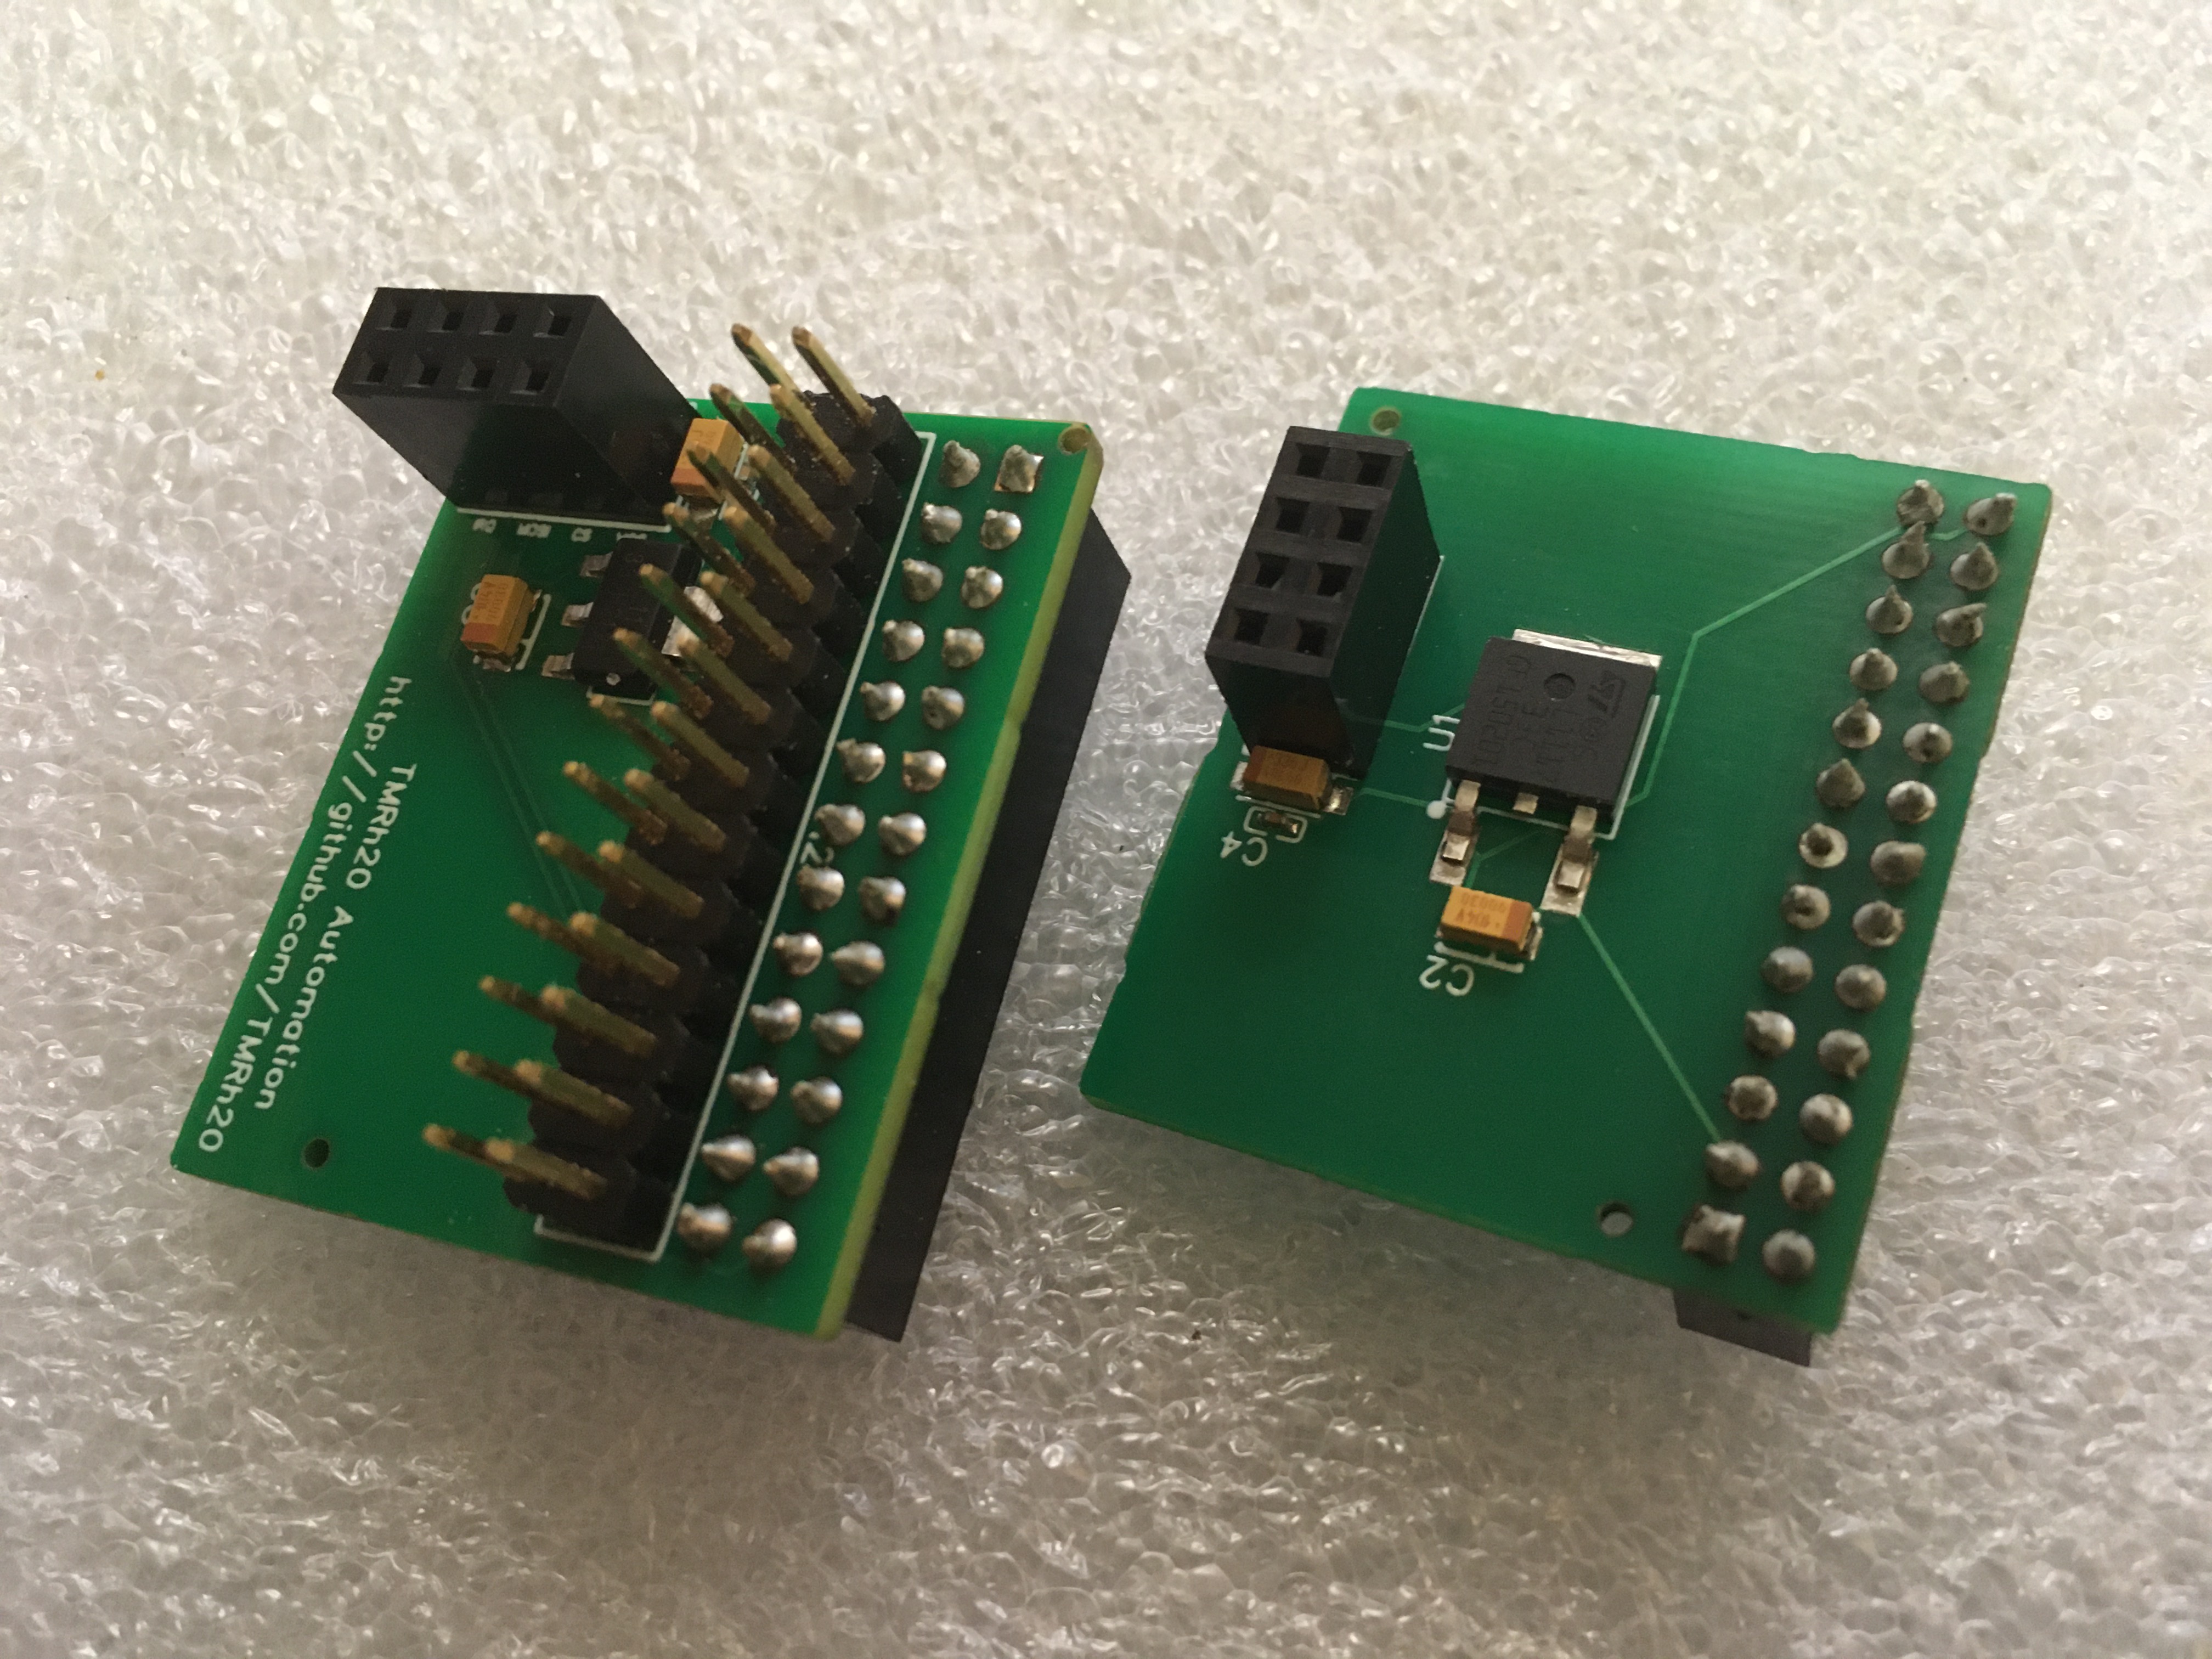
I recently had some circuit boards made, as I have had enough experience working with nrf24l01 radio modules that I've encountered numerous issues regarding power supplies and the need for additional capacitors soldered to the radios. 

These boards connect to the 5v pins of the Raspberry Pi, which can supply plenty of current for the radios, and converts it down to 3.3v. I've designed two boards, one that fits inside the case, and the other that fits outside the case, so they should work with most cases, though some cases may need modifications. The designs both use a 26-pin header, so they are compatible with earlier versions of Raspberry Pi as well.

Raspberry Pi - nRF24L01+ adapters

These adapters will support even the PA+LNA versions of the radios, so you can extend the range of your wireless networks considerably over the standard modules. They include extra capacitance, with capacitors placed right beside the VCC and GND pins of the radios, so there is no need to solder on additional capacitors.

Shields are available at https://tmrautomation.myshopify.com/

Monday

The RF24 Communication Stack: What are the different layers and which one do I use?

 The RF24 Communication Stack:

What are the different layers and which one do I use?

Over the past number of years, I've been developing a communication stack for nrf24l01+ radios, generally to be used with Arduino and Raspberry Pi devices. The comm. stack is organized into separate layers, per the OSI model, which allows users to establish communication between any number of devices depending on their needs.


1. The RF24 layer: This layer is generally used for simple device-to-device communication, where speed and simplicity are key. One example is for radio control of a single device, where a stream of small data packets are communicated from one device directly to another in rapid succession. Streaming of audio in real-time is another example where the RF24 layer would be used directly. Using the RF24 layer can be a bit complex, and some knowledge of radio communication is beneficial.

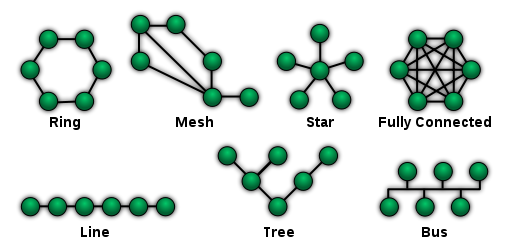
2. The RF24Network layer: This layer expands on the RF24 layer by providing a number of features, both to enhance radio communication and provide users with the features of an OSI layer 3 (network) layer. RF24Network nodes are arranged in a static tree topology, and this layer provides all the features to manage them. RF24Network handles routing, fragmentation/reassembly of large packets, and communication to any other device is straight-forward. Users don't require knowledge of the RF24 layer to operate a network of nodes at the RF24Network layer, and it can be much simpler than using the RF24 layer directly. Recommended when not able to use the RF24Mesh library, when there is a need for static nodes, or to simplify one-to-one communication.

3. The RF24Mesh layer: This layer expands on all underlying layers by providing an automated, self-healing network that allows nodes to move around and or re-establish connectivity as required. This layer is generally recommended when creating a network of devices, as it automates addressing for RF24Network, and provides a more seamless interaction. Users generally communicate using the RF24Network API, with RF24Mesh providing address lookups and automation for the network. 

4. The RF24Ethernet/RF24Gateway layer: This layer allows communication using standard networking protocols, such as TCP, UDP, ICMP. It is generally recommended to run RF24Gateway on a Raspberry Pi as the master node, with smaller devices running RF24Ethernet. Allows very simple or very complex communication scenarios, with users requiring little to no knowledge of radio or RF24 programming APIs. 

The RF24Ethernet API is very similar to the Arduino Ethernet API, and RF24Gateway allows users to use standard networking tools to communicate with devices running RF24Ethernet. Recommended for communication scenarios where speed is not essential, but reliability and consistency is, such as a home automation system using MQTT and Node-Red and/or a sensor network reporting data. Users can run a wireless, Arduino based webserver, or interact with nodes using their mobile device over MQTT, HTTP, etc. 


As can be demonstrated, each layer has its place, providing communication capabilities for a very wide range of scenarios, and allowing users to benefit from the built-in features or to dig right in and customize things to the nth degree. Generally, the higher you go up in the stack, the simpler the interaction, with complex underlying code providing the simplest and most advanced user interaction.


Related Code and Documentation:

https://github.com/nRF24/


Friday

ESP32 - Playing around with the I2S peripheral and DAC audio output

 ESP32 Arduino - Playing around with the I2S peripheral, ADC and DAC audio output

 In some of my last posts, I mentioned the ESP32 based boards I recently received from DigitSpace, and I finally found some time to play around with some of the audio based peripherals. In this case I'm starting small, attempting to create a simple sine wave output using the internal DAC.

The documentation for the I2S peripheral is a bit limited it seems, but there is enough information in the Arduino Github repo to make sense of things and get some basic audio output going.

The general theory seems to be pretty simple compared to working with previous libraries, TMRpcm and AutoAnalogAudio, which utilize timer driven interrupts and nested interrupts (AVR devices) to handle asynchronous audio processing. The ESP32 provides a number of methods to handle audio processing, with peripherals designed to offload this work from the central processor, making the user interface mostly about buffering and handling audio data.


The above code will produce a simple sine wave output on the DAC pins (see previous ESP32 related posts for pinout) and can be toggled off/on by entering a '1' on the Arduino Serial monitor. An audio file can also be defined and played by entering a '2' in the Serial monitor. In this case the sketch is setup for a 32Khz, 16-bit, Mono audio file.


In this case the hardest part is following the documentation found above and figuring out just how simple it actually is to handle the I2S peripheral. Really, you just configure the appropriate sample rate and output pins, mode etc, and then feed data into the peripheral. If doing any digital signal processing, its really about providing enough CPU time to handle the data and feed it into I2S. If handling audio files, the hardest part is decoding.

This should prove to be a good basis for the AutoAnalogAudio library since the only thing left to do is add ADC support and either use timers or RTOS tasks to handle asynchronous processing of the audio.

Sunday

nRF24l01+ Library Roundup
Overview and Status of RF24 Arduino/Linux Comm. Stack

Six, seven years? Has it really been that long? According to GitHub that is in fact the case, as my first commits to my own fork of the RF24 library took place in early 2014. It all started by identifying existing limitations in the available libraries and working to achieve the highest level of performance and reliability possible. The main fork for RF24 at the time was written and maintained by ManiacBug, but he dropped off the scene shortly after publishing this very nicely designed library. Other users attempted to add support for various devices and address certain bugs, but nobody had really taken a thorough look at the capabilities of the hardware vs what was achievable at the time. Only through a lot of reading, testing and learning to program was I able to make those initial changes to begin work improving the RF24 core library. Looking back now, I am very grateful that I picked ManiacBugs code base as a place to get back into programming in C/C++, as it was well thought out and I discovered ways of doing things that I previously did not understand or know about.

And with that began a long and arduous journey into the internal workings of nrf24l01+, Arduino (AVR) and RPi (Linux) devices with the stated goal of optimizing the library to whatever extent possible. Once the RF24 library began to take shape, I began looking at the RF24Network library, another very nicely designed bit of code by ManiacBug, but it had its limitations and problems. Many issues were addressed, features and functionality added in order to push the nrf24 devices to the test in a multi-device scenario. It performed much better than expected using this OSI Layer 3 (network) library.

At that point, I began to really understand the OSI model, how the different layers actually work together and what they do down the last bit. Based on a number of conversations and user input, I came up with the idea for RF24Mesh, which is basically another layer on top of RF24Network -> RF24 that handles addressing, similar to DHCP, but able to verify connectivity and reconnect nodes at any point in the mesh. This allows nodes to move around and reconnect quickly as required while maintaining the mesh structure. The Network & Mesh layers use a 'master' node that acts like the gateway in a standard IP network, and it provides addressing and resolution for RF24Mesh.

Based on input and discussions with users and the performance of the radio modules when used in a multi-device mesh/network scenario along with the emergence of IoT and sensor networks, it seemed like the thing to do would be to work my way up the OSI model, so that is exactly what I did. Upon discovering the uIP stack for Arduino, I realized it would be possible to add ip4 support to some of the smallest devices like ATmega328 AVRs, and larger devices like RPi could just use their own IP stack and encryption etc. The uIP stack and related software was quite a challenge to understand and implement, as uIP is written in C and is designed to be as small and lightweight as possible as opposed to being human readable and easy to understand. The UIPEthernet library was also essential in helping me to understand and implement RF24Ethernet.

With that, an OSI RF24 comm. stack was established, with RF24, RF24Network, RF24Mesh, RF24Ethernet and RF24Gateway libraries all working together and inter-operational at any of the layers. This means that on a RF24Gateway/RF24Ethernet mesh network incorporating RPi and Arduino nodes, devices can choose to operate using OSI layer 2,3,4,5 and/or 7 (Data Link, Network, Transport, Session, Application). When using the higher layer libraries (RF24Gateway & RF24Ethernet) standard IP connectivity is established and devices can utilize standard encryption & authentication protocols (SSH, HTTPS etc.) to secure their traffic as per the OSI model.

The RF24 Communication Stack vs The OSI Model

With the associated libraries and enhanced functionality, the RF24 comm. stack is able to provide IoT and sensor network connectivity and capabilities to suit many different scenarios at a very low price point with much lower power consumption than WiFi networks. With the production of many devices like RPi, ESP8266 and ESP32 which support WiFi, users can construct and deploy IoT networks very easily, extending them as required.

Even now, it is really kind of cool to witness the system in action, using these little radios on tiny little computers we refer to as 'Arduinos'. The methodology and processes in place to manage a network of devices, fragmentation & reassembly, mitigate wireless data collisions and ensure delivery of data are quite effective, from the radio hardware and auto-ack functionality, all the way up to the TCP/IP and Mesh levels. With TCP/IP for example, using Raspberry Pi devices, the MTU is 1500-bytes, so each packet can require up to 63 sequential, successful data transmissions at the core RF24 layer, but this still works relatively well in real-world testing/usage.

It has been a lot of fun and a great learning experience so far. The creation of RF24Gateway really allowed the limits of the radios to be tested, and provided an excuse to play around with different network/IP configurations, routing scenarios and traffic handling at any level of the OSI model. A full and complete understanding of how devices operate on the internet or similar networks helps dramatically in troubleshooting, testing and development of systems and software that operate using these protocols.

Going forward, the development of the RF24 libraries has slowed significantly along with bug reports and issues. My focus has recently been on cleaning things up, finding and fixing bugs, mostly in the higher layers, and improving the user interface via examples and documentation. I had previously almost given up on the RF24Gateway and Ethernet layers as being too difficult to fix, but with the rise of more powerful MCUs and the potential for expanding their capabilities, it seems worthwhile to take another crack at working out bugs and issues.

 It would be nice to find another similar radio device with lower power consumption and/or more advanced capabilities and throughput to create more robust networks and mesh capabilities. The current design allows for speeds up to about 20KB/s over IP (RF24Gateway) using two Linux devices, but it would be nice to have a higher throughput to allow for more nodes, longer range and more advanced communication scenarios.

In conclusion I want to extend a big thank you to everybody who contributed ideas, analysis, information and programming skills along the way. An extra thank you to Avamander (GitHub) who has played a big part in ongoing maintenance, support and development!

Update: Aug 2020

Wow, I mentioned that I would be working on finding and fixing bugs due to the slowdown involving support, dev and maintenance etc, but did not expect to spend so much time, or that I would be able to identify so many issues, their root cause and a solution. Some pretty significant issues have been fixed throughout the RF24 stack, including 1 major bug in RF24, affecting all libraries, a number of bugs/issues affecting functionality and reliability in RF24Network and RF24Mesh, and a memory issue in RF24Ethernet affecting stability.
RF24Gateway has been updated with better handling of interrupts, a few corrections and the first release made, v1.0 due to all the issues that have been addressed. Again, a portion of these improvements are due to assistance, testing and input from a select few users. Users should notice a marked improvement in stability, functionality and the ability to recover from significant errors/hardware issues.

RF24 Communication Stack:
https://github.com/nRF24
https://nrf24.github.io/RF24Gateway
https://nrf24.github.io/RF24Ethernet


Wednesday

RF24Mesh - Dynamic Mesh Networking for NRF24L01+ Radio Modules
An Overview of Progress so Far


Overview:

RF24Mesh is a C++/Arduino/Linux/Raspberry Pi library allowing many devices to simultaneously connect wirelessly and remain connected in a mesh style network using nrf24l01+ radio modules. Nodes can communicate with any other node on the network, including a master node that acts as a gateway for the mesh, providing addressing and lookups.

Once assigned a unique ID, everything is automated, and nodes can move around and rejoin the mesh at any point where another node is in range. RF24Mesh supports some of the smallest and most power efficient devices available.

The RF24 Communication Stack is based on the OSI model, and RF24Mesh makes use of the features of the lower layers (RF24 (Layer 2) , RF24Network (Layer 3), and the overall capabilities can be extended via RF24Ethernet (Layers 4&5 TCP/IP)

Setting it Up:

The main thing when setting up a mesh network is to configure and test your devices accordingly, to make sure they are in a fully operational state. Most if not all of the available radio chips being sold are clones, so I've found it necessary to modify the radio devices slightly in some cases. In many cases, a capacitor (10-100uF) is added directly to the VCC/GND of the module itself to help with common power supply issues.

In the case of these modules, I've found that scraping down the last bit of the antenna, and soldering on a small 3-4" piece of wire greatly improves their performance:
In the case of the high powered PA + LNA modules, I've found it necessary to add shielding as in the post found here. Placing them close to a ground plane seems to help as well. Operating them at a lower power level may be required if the power supply is not adequate.


The modules that are low powered with an antenna generally work out of the box.

I generally recommend using an adapter, to provide a stable power source, even for the low powered modules. I've been using them with many of my modules.

From there it is a matter of installing the Arduino libraries etc. which is covered in the documentation and in earlier blog posts and the official documentation below.

How it works:

RF24Mesh leverages the features provided in the supporting libraries, RF24 and RF24Network to provide connectivity between many devices, even if they are far away from the central node or moving around. Each node is assigned a unique identifier (1-255) and uses that high level-address to request a dynamic address at the network layer, according to the structure of the mesh and proximity to other devices in the mesh. Nodes typically communicate using the RF24Network API, with RF24Mesh working at a higher layer to provide address lookups, dynamic addressing and connectivity.

Nodes arrange themselves using a tree topology around the master node, which provides address lookups etc. for the mesh. At any given time, each node has a path of communication through the network, and can re-establish and verify a new link if the current path fails. In each network there is the master node (the base node), children of the master node (relay nodes) with children nodes themselves, and leaf nodes, (children of the master or its children) with no child nodes attached.

The protocol is fairly simple for each node. On power up or reset, nodes attempt to find a connection by using multicast. Multicasting is arranged into 5 levels, so the master node is contacted first, then its direct children, then their direct children and so on, making the way nodes attach themselves to the network tend towards close proximity to the master node in a tree-like structure. Once contact is made the node requests an address from the master node, either directly or through other nodes. Once an address has been assigned and verified, the node is considered connected to the mesh and can then communicate with all other nodes in the mesh, and beyond to other systems etc.

Nodes have the option of managing their connection however desired, and quite often, a simple timer is suitable to verify connectivity after a set period of time. Transmitting nodes can also detect when communication is failing and re-establish their connectivity to the mesh as required. That is, at any given time, nodes will have a single path to communicate over the network, but if that link fails, they can re-establish their communication path through the network.

The communication layers are interoperable, meaning a network can combine devices running RF24Network and RF24Mesh libraries together, with static nodes running RF24Network, and dynamic nodes running RF24Mesh. Devices running RF24Ethernet (TCP/IP) can also communicate using the other layers of the libraries, interacting directly with RF24Mesh and/or RF24Network nodes. This allows an array of devices to operate on the same wireless mesh network, from ATTiny all the way to the more powerful devices like ESP32 and Raspberry Pi, using the RF24Network, RF24Mesh APIs and/or standard networking tools and protocols. (ICMP/TCP/UDP, etc.)

Current status, testing etc. 

RF24Mesh is now past the development/beta testing stage and considered (by me) to be stable and well tested. The mesh can handle a large number of nodes, theoretically up to 255, but in practice, more like 15-25 nodes sending or receiving data every few seconds is a reasonable bet. It generally depends on the type of traffic and frequency with which it is generated, as a much larger number of nodes reporting data every minute presents only a small load for the network.

The progress made with RF24Mesh is very encouraging, supporting simple communication scenarios, small household sensor networks, home automation systems, and larger expanded networks stretching over relatively long distances with the more powerful RF24 modules.

The RF24 communication stack is generally complete, with bug reports and issues dropping off quite nicely, but development is still ongoing. As always, please report any potential bugs or issues using the GitHub link below. 


Friday

Summary: A Personal Experiment & A New Model for Open, Open-source, Anonymous & Secure Wireless Communication
Communication, Network, Protocol Design & Implementation Using Arduino & Raspberry Pi


Updated Nov 23, 2016

Over the course of the last few years, I have been working on a standardized, open-source communication stack that can be scaled from the biggest, most powerful devices, to tiny inexpensive devices like Arduino micro-controllers.

This looks familiar!

In the course of this time, I've made great progress in development of the core RF24 radio driver for nrf24l01+ radio modules. The overall goal of this project is independent of the radio devices, but these devices were chosen due to their relative capabilities vs cost, availability and ease of use. They are simply 2Mbps half-duplex wireless communication devices. Virtually any type of wireless devices can utilize the same theory of operation, including the mesh (RF24Mesh) style protocols.

What is it ? This system/communication stack allows nrf24l01+ radio/wireless devices to be utilized as a standard Network Interface Card (NIC) using TCP/IP & Mesh protocols. This is a summary of the experiment, system, general operation, and some of what I've learned.

Why? The programming, design and implementation of this system is part of a personal experiment I've been conducting involving the nature of wireless communication systems and protocols in relation to privacy, security, the Internet and the Internet of Things.

Theory of Operation & Design:


Consideration A: Open Networks + Anonymity + Automation


In general operation the basic principle of the communication stack is thus:
1. Each device utilizes a unique identifier while connected to a given access point.
2. This 'unique' identifier essentially represents an IP address in this implementation
3. For reasons of simplicity, this implementation also requires a 'static' identifier or IP address, but using more powerful micro-controllers and radio devices, the identifier can be assigned randomly or via DHCP
4. Devices simply attach, at any point in the network, using any available node(s) as an access point.

In a large scale model incorporating this type of design, with proper randomization of identifiers, individual devices and users are (potentially) indistinguishable from one-another initially and generally anonymous.

The next stage of course involves communication to enable the IoT/automation & allowing any capable device to connect. In this case there appear to be some options:

Option A: Leave the network open, and devices can choose to encrypt/authenticate their communications.This may require additional protective measures to prevent abuse in a large or publicly accessible system.

Option B: Assign selected devices a shared "network key" of sorts and incorporate encryption protocols into the network

Either way, it seems that wireless devices & users can inherently maintain their relative anonymity in a system that is designed a little differently.


Consideration B: Mesh Networks

The Network Layer: 
In studying the different layers involved in a capable communication stack, it seemed that many of the boundaries between layers were blurry, with many different systems 'breaking the rules' as it were. A good example of this is TCP/IP which does not strictly adhere to the OSI model.


In my design, a 'static' network architecture is used, which resembles a tree configuration. The simplicity of the RF24Network layer means that each node can handle routing of any type of information, and only needs to know which nodes it is directly connected to. 

Some of the features/functionality involving the RF24Mesh layer have been placed into the RF24Network layer directly. The reasons are mainly due to efficiency and limitations of small devices and this is under review.

Due to the limitations of the specific device used ( nrf24l01+ ) radio modules, each device is limited to 5 individual connections in the mesh, but this could be easily extended for use with more powerful radio devices.

The Mesh Layer:


The mesh layer utilizes its knowledge of the 'static' network architecture to allow individual nodes to attach themselves to the network at any given point where another node is active.

As mentioned above, each device is currently pre-assigned a unique identifier from 0-255 due to the 8-bit nature of very small & low power devices. In a large scale or commercial implementation, these identifiers can be assigned automatically & randomly, with devices then registering themselves in DNS if required, or simply acting as an anonymous client.

The fundamental benefit of a mesh style network is that nodes will automatically adjust their physical address and connection as required as they move around the network or lose connectivity. Any other nodes will provide connectivity by allowing other nodes to attach, and routing or accepting their traffic according to specifications.

Per RF24Network design, there is very little overhead for individual nodes, since they only need to keep track of which node they are connected to, and which nodes are using them as an access point.

Consideration CLimitations

There are currently a number of fundamental imitations and odd 'quirks' that have to be dealt with due to the nature of really small devices like 16Mhz AVR devices.

AVR Devices: The chosen limitations in this case include some of the smallest and least power hungry devices available to any consumer. ATTiny devices can operate as low layer nodes & relays using RF24Mesh, and slightly faster 328 based AVR devices can run an actual IP stack.

uIP TCP/IP Stack:  One of main issues with small devices involves certain limitations of the IP stack. As soon as slightly larger devices are utilized, more robust IP stacks are available that make operation faster and more reliable. uIP has provided a very interesting learning opportunity and is quite amazing given what it can do with extremely limited resources.

Radio Devices: nrf24l01+ radio modules are max 2Mbps half-duplex communication devices with a specific 5-byte addressing scheme.


Consideration D: Fully Automated Networks


Software and wireless development capabilities have come to the point of enabling fully autonomous networks that essentially manage themselves, devoid of human interaction. This goal has been partly realized or demonstrated in theory and action with the RF24Mesh layer, and could easily be built upon and implemented by large scale commercial interests.

The concept of independent networks that configure and maintain themselves may seem to some as a wild idea or a bit of a pipe dream, but we have all of the tools and capabilities within our grasp. It is simply a matter of engineering and development.

Connectivity of individual users can be managed entirely via authenticated and encrypted connections, so there is clearly no need for individual identification of users or user management beyond the application layer.

This type of system could allow communities to simply put up hardware and provide access. The system would be automated to the point that if a device fails, nearby devices send out an alert and the equipment is replaced. That is all.

Consideration E: Wireless Technology and Potential Breakthroughs


Communications technology, aka the Internet, has become ubiquitous in many ways to the daily life of millions and millions of individuals and businesses. Unfortunately, this type of connectivity has not been available to consumers in poor, rural or remote areas in a real, usable way.

Even with existing satellite technologies showing great promise towards providing quality communications capabilities to new places, it seems that additional measures will need to be taken to provide for the age of automation. This is the kind of automation that will see real-time control scenarios, with vehicles communicating among themselves, drawing in information from traffic control systems, news, weather, and countless other systems.  This is the kind of automation that will see drone based grocery and package delivery, combined with, at some point, flying vehicles and high speed transportation systems.

The implementation of automation on a massive scale is going to require something better than the kind of service we get from existing cellular networks and current technology. This is going to require a lot more than what public cellular, 5G and fiber technologies can provide. What we need moving forward is not just a standard step forward in communications technology, but a giant leap forward, while keeping in mind all the things that make the internet and technology beneficial to everybody.


General Summary:

It now seems entirely possible and practical to design and implement fully featured, autonomous. large scale, wireless network architecture that fundamentally provides anonymity and promotes privacy among its users, while providing full mesh networking capabilities and automated network management.

With the emerging nature of communications devices, potential breakthroughs in communication technology, and wireless/IoT/automation technology emerging as a major component of our future progress, it seems very important to study, understand and develop networking and communication technologies with us, the users in mind.

It also seems that wired communications systems have already become a thing of the past, with more and more devices embedding chips and features to support Wireless and WiFi protocols and interfaces. The importance of privacy and security is fundamental to the operation of any large or public communication system, and any large, public & worthwhile communication platform will incorporate these basic ideals as inherent to its operation.


http://nrf24.github.io/RF24Ethernet

http://nrf24.github.io/RF24Gateway


Wednesday

RF24 Addressing: A review of NRF24L01+ radio addressing
Pipes, Addresses and Acknowledegments


There still seems to be a fair bit of questions, misconceptions and misunderstandings regarding the nature of RF24 radio addressing and how to set up communication scenarios. This is a review of RF24 pipes, addressing and acknowledgements that should provide any user with enough information to set up any supported configuration.


Acknowledgements (ACKs):

The radios support an automatic acknowledgement feature, enabled by default, in which the receiving radio switches into transmit mode after reception, and acknowledges reception of data.

1. A sends to B
2. B responds to A
3. A is now aware that B received the payload successfully

The acknowledgment process is very important to understand, because correct addressing is required for this feature to function properly.


Simplest Explanation/Rules of Addressing (Using ESB/Auto-Ack):

1. When using Auto-Ack, every radio can utilize a maximum of 6 unique addresses at once, which other radios can send data to.

2. Each address is assigned to a logical "pipe", and each radio has only 6 pipes that can be assigned addresses.

3. Since auto-ack implies a bi-directional communication channel, each address/pipe can only support communication to a single radio using acknowledgements. If two or more devices send data to a single pipe/address, auto-ack should be disabled to prevent ACK spamming and erroneous acknowledgements.
   Exceptions:
   a: Disabling Auto-Ack - This prevents excessive spamming of acknowledgements and errant acknowledgement.
   b: Timing of Transmissions - Using a token-ring style network or other method of preventing simultaneous transmissions would allow multiple radios to send data to the same pipe/address while maintaining the reliability of acknowledgements.

Note: At 1MBPS, a transmission can take up to 85ms or so, and overlapping transmissions are likely with any significant traffic

4. Per manufacturer design, the addresses assigned to pipes 1-5 must be the same, except for a single byte.


Basic Scenario - One to One Communication with AutoAck:

For purposes of standardization and to allow the system to be scaled, it is generally recommended to use two radio addresses. With auto-ack disabled, a single address can be used for all radios, or groups of radios.


Code:
Radio #1:
byte address_1[] = {0xCC,0xCC,0xCC,0xCC,0xCC};
radio.openReadingPipe(1,address_1);
Radio #2:
byte address_2[] = {0xC3,0xCC,0xCC,0xCC,0xCC};
radio.openReadingPipe(1,address_2);


Process - Radio #1 sending to Radio #2:

1. Radio #1 opens pipe 0 for writing (and internally, reading) using address of Radio #2 (CCCCCCCCC3)
2. Radio #2 receives the data on the first attempt, and (internally) opens a writing pipe using its own address (CCCCCCCCC3) and sends an acknowledgement back to Radio #1
3. Radio #1 receives the ACK, so does not engage in a series of timed retries


Basic Scenario - One to One or Many to Many Communication with Multicast:

With AutoAck disabled, radios can share the same address, and the system can still be scaled to support any number of devices.

Code:
byte address_1[] = {0xCC,0xCC,0xCC,0xCC,0xCC};
radio.setAutoAck(0);
radio.openReadingPipe(1,address_1);

In this situation, any radio can send a message to all other radios sharing the same address:

Code:

radio.stopListening();
radio.openWritingPipe(address_1);
radio.write(&data,sizeof(data));
radio.startListening();


Simple Mesh Scenario - Five-to-Five Communication with AutoAck:


In the above scenario any radio can send or receive data from any other radio in the mesh, thus creating a 'true mesh' of 5 nodes.

Radio #1 will always open a writing pipe using the address assigned to pipe#1 of the recipient.
Radio #2 will always open a writing pipe using the address assigned to pipe#2 of the recipient.
Radio #3 will always open a writing pipe using the address assigned to pipe#3 of the recipient.
... and so on

Process Confusion:
In this example of addressing, if Radio#2 and Radio#3 were to both open a writing pipe to Radio#1 using the same pipe/address, there would be confusion with acknowledgements. Radio#1 will respond to both devices with acknowledgements, since they have both opened a writing and reading pipe using the same address.


Complex Network/Mesh Scenario - Many-to-Many Communication with AutoAck:


As can be seen, this format of addressing is very similar to creating sub-nets with IPV4 addressing, except here we are using HEX instead of decimals, and there are 5 bytes per address instead of 4. Each radio is linked as shown in the image below, and each radio has a unique communication channel (pipe/address combination) to use when communicating with any of its parent or child nodes.

Due to the correlation of addresses and associated topology, each radio only needs to be aware of its parent and child nodes. Any traffic sent to a given node will either be a: Accepted b: Routed to parent c: Routed to a child

Address configuration, routing etc, can be managed very simply by masking and bit-shifting.


In the above example, pipe0 is NOT assigned a reading address, leaving it available to be used for broadcast or multicast. With AutoAck disabled on a single pipe, or by using selective acknowledgements, all radios or groups of radios can share an address, thus all radios will receive all messages sent to that address.

See the RF24Network Documentation and Source Code for more information regarding this type of configuration.


Summary:

In many low-throughput situations, the radios will appear to function correctly even with improper addressing, and may not cause any obvious problems, however, performance and functionality will most certainly be affected.

In any situation where reliability and acknowledged payloads are important, proper addressing and an understanding of the underlying processes behind acknowledged payloads is very important.


Raspberry Pi/Linux with the nrf24l01+ & RF24Gateway
 A guide/example of advanced RF24/nrf24l01+ usage and monitoring on Linux devices

Overview:

There are many examples of basic RF24 usage, but not so many demonstrating complex communication scenarios and networking. The RF24 communication stack is free, with all development information, examples, code and documentation available on GitHub, designed with Arduino and RaspberryPi/Linux devices in mind.

The RF24 stack generally follows the OSI model, and provides a separate library for each layer, with efforts toward proper documentation for each layer. This allows any type of data/communication to pass over the radios, including TCP, UDP or any other protocol, and users can write their own code to link devices together using any layer(s).

So, what can we really do with these little radios?

The nature and low-cost of the system allows literally anybody with interest in wireless communication to setup, deploy, and experiment with small scale, self-healing wireless networks, or start writing their own code with the core RF24 driver, in a very short period of time.

The stack currently does not include sensor specific code or functionality, it is simply a communication stack which enables all kinds of different functionality.


Requirements, Hardware Setup & Installation:

1. A Raspberry Pi or Linux device a compatible radio device connected
    RPi Install Script

2. An Arduino device with a compatible radio device connected
    Arduino Install (Select RF24, RF24Network, RF24Mesh, RF24Ethernet libraries)

See the RF24 docs for hardware setup info & installation
Note: Please report any issues at https://github.com/TMRh20/RF24/issues

Demonstration and Information:

The video below demonstrates how to use RF24Gateway in general - Setting up nodes and communicating over RF24 using RF24Network, RF24Mesh, and standard protocols (ICMP, HTTP, SSH), along with monitoring

1. Config on RPi & Arduino devices
2. Complex mesh networks: How the different layers (RF24Network,RF24Mesh & RF24Ethernet) can be used with RF24Gateway
3. RF24Ethernet: Simple TCP/IP communication and web server running on Arduino over RF24
4. RF24Mesh: Node config & interaction with RF24Gateway
5. RF24Network: Node config & interaction with RF24Gateway
6. How to use WireShark to monitor user payloads with RF24Gateway and LUA Wireshark dissector script (using laptop w/SSH & X11 forwarding in this example)
7. How to configure Raspberry Pi as a standard node in an existing RF24Mesh
8. How to sniff RF24Network, RF24Mesh, and RF24Ethernet traffic using RF24Gateway & Wireshark(optional)
9. Tacos... oops they were already eaten, maybe next time


As shown in the video, any nodes running RF24Ethernet, RF24Mesh or RF24Network can be used with a master node running RF24Gateway, allowing users to try out or utilize the different layers quite easily.

RF24Ethernet: Provides TCP/IP communication. Very simple and reliable way to control on/off devices via a web browser or scripting. Has all functionality of lower layers.

RF24Mesh: Provides automatic (mesh) networking for RF24Network. RF24Mesh networks are self-healing and dynamic in nature.

RF24Network: Provides addressing, routing, fragmentation/reassembly of payloads via manual/statically defined wireless networks.

See the detailed overview and related pages at http://nrf24.github.io/RF24Ethernet


HB-100 / GH1420 10.25GHz Microwave/Doppler Radar Motion Sensor w/Arduino


I picked up some of these modules out of curiosity, as these modules can detect the motion and speed of objects through walls or other non-metal obstacles.


Overview:

The modules themselves are fairly simple in use, since they output a signal with the frequency/pulse width indicating the speed, and the amplitude/voltage indicating the strength of the reflected signal.

The speed is very simple to calculate once the frequency of the incoming signal is detected:

km/h = hz / 19.49
mph = hz / 31.36

These HB-100 modules require a pre-amp circuit to boost the IF signal, so I used an LM358N and the circuit at https://hackaday.io/project/371-hb100-radar-shield to boost the intermediate signal.

The output of the circuit sits at about 2.5v when quiet, and moves up & down to represent the received AC waveform.

In pure digital form, this would be very easy to detect using interrupts, but with an amplified analog signal, weaker signals may be missed.

Problem:

Tests with this radar shield using standard frequency counters/libraries seemed to show that interrupts and edge-detection have limited sensitivity to weak signals. They also provide no means for detecting the amplitude of the signal. It seemed that using the on-board ADC may provide better results in this frequency range. (0 to 4000 Hz or 0 to 205km/h)


Goal: 

Detect the frequency and amplitude of low frequency (0-4khz) signals from HB-100 modules, while potentially increasing the sensitivity of waveform detection using the HB-100 & circuit as linked above.

Result:

The resulting code uses the Arduino ADC to sample incoming signals using very simple peak-to-peak detection.

Signals are detected when the waveform transitions above or below a set "midPoint" which represents the 0v value of the AC waveform. Typically, it will be ADC_RESOLUTION / 2.

This is very similar to the edge detection used for interrupts and digital signal detection, but using the ADC to detect weaker transitions.


ADC Resolution / VCC == Volts per Increment ( 1023/5v = 0.005v )
Sensitivity of 10 == peak-to-peak detection of +/- 0.05v signals


Technical Info:

The ADC is driven in free running mode, taking samples at about 38.5khz while looking for specific deviations in the measured voltage that correlate with a peak-to-trough waveform.

The results are summed in a single variable, and returned either as a single result, or an average, depending on how often the results are read in relation to the received signal.

Information about the signal, including frequency, amplitude and number of samples allows more complex analysis.

Conclusion:

The code was developed in a very short time, and can still be considered a work in progress, although it seems good as-is. It tests well up to about 2-4khz with another Arduino producing square wave output. When used with the radar module, it is very sensitive, and allows the sensitivity of the device to be defined in software, and/or results to be filtered.

Code & Examples:

https://github.com/TMRh20/AnalogFrequency


Sunday

RF24Gateway - Creating Hybrid IoT Networks using TCP/IP and RF24Network

 RF24Gateway User Interface Example


RF24Gateway is a new complimentary library to RF24Ethernet, designed for RPi and Linux based devices with SPI and GPIO capabilities (BBB, Intel Edison, Galileo, etc).

The RF24Gateway library acts as a network/internet gateway, and allows Arduino/AVR based sensor nodes to interact with each other, the environment, and the world using TCP/IP and/or lower level RF24Network messages.

In short, it allows hybrid IoT networks to be created using Arduino and nrf24l01 modules. Some nodes are capable of internet or local network communication using standard protocols (TCP/IP) and/or RF24Network messages, while other nodes can communicate only at the network level, using only the lower layer RF24Network messaging.

Once RF24Gateway is configured, nodes can be controlled completely using standardized tools and protocols. Additional client examples have been added to demonstrate how to control and/or receive information from sensor nodes using standard tools and scripting methods via Bash, NodeJS and Python scripts. Any method of establishing a TCP connection can be used, with the examples generally using HTTP to some degree as well.

Libraries and code that utilizes RF24Network can utilize RF24Gateway in much the same way, since external data types (TCP/IP) are handled out of sight from the user. RF24Network is used exactly the same way, except that the gateway.update() function is called instead of network.update() or mesh.update(). The included examples demonstrate usage.

Note: RF24Gateway defaults to using a TUN interface with RF24Mesh enabled. RF24Ethernet examples have been updated to accommodate this.

Current Status:

April 2015: Near completion. Integrated fully with RF24Ethernet. Graphical (NCurses) interface example finalized.

Source Code:
https://github.com/TMRh20/RF24Gateway

Documentation:
http://nrf24.github.io/RF24Gateway

Download (See documentation for installation info):
https://github.com/TMRh20/RF24Gateway/archive/master.zip

Wednesday

ENC28J60 Network Modules, Arduino and the Internet of Things (IoT):

An experiment, overview and analysis of TCP/IP networking with Arduino Ethernet

The module in question was sent to me by the friendly people at ICStation.com , in exchange for a review of the module itself.

Video Review:


ENC28J60 Mini Network Module:
http://www.icstation.com/images/big/productimages/4060/4060.JPG
  • 3.3V operation
  • Create a mini Arduino Web Server or Client
  • Plugs into your home router or modem just like a computer

    The uIP TCP/IP stack is software driven, while the ENC28J60 module handles the data mainly at the network (Ethernet) level. One main difference between UIPEthernet and the official Arduino Ethernet library is the need to keep the TCP/IP stack updated via software with the ENC28J60.

    Hardware: 

    The ENC28J60 was very easy to wire up, using the default SPI pins shown at http://arduino.cc/en/Reference/SPI along with the VCC and Ground pins.

    The device seems to work ok connected to the 3.3v output of the Arduino, but it seems best to use an external power supply or battery
    .

    Software:

    Two main libraries appear to be available: Ethercard and the UIPEthernet libraries. This post will focus on usage via UIPEthernet, since it shares a common API with the official Arduino Ethernet library.

    I am using the UIPEthernet library and examples found at: https://github.com/TMRh20/arduino_uip/tree/fix_errata12

    In attempting to utilize the modules and UIPEthernet for creating a simple webserver, I ran into a number of issues with data being sent or received incorrectly. Over a number of days, and benefiting from the information gained in building the RF24Ethernet library, I have been working to improve UIPEthernet, and also created some examples to demonstrate the issues and current usage.

    (A pull request has been made regarding these suggested changes to the main library)

    Overview of Library Changes (At the time of this post):
    Changes:
    • Introduce client.waitAvailable(); function  - Ensures the IP stack is processing incoming data while waiting for incoming data for a maximum defined duration in milliseconds: client.waitAvailable(3000);
    • Introduce Ethernet.update(); function - Allows user applications to ensure the IP stack is processing data while delaying or performing other tasks: Ethernet.update();
    • Perform additional processing of data while calling client.available();
    • Per testing, reduce max segment size (MSS) and the receive window to 511 bytes from 512 due to unidentified issue.
    • Reduce number of packets per socket to prevent data loss
    • Re-open the TCP window at timed intervals when data has not been sent or received on an open connection to prevent stalling during large downloads
    • Fix for outgoing data corruption
    • Force application to wait while writing data 
    • Better TCP window handling
    • Other minor changes, add examples
    Changes - Technical Summary:

    The first changes introduced added some new functionality, geared towards a software driven IP stack.  With the addition of additional processing and the Ethernet.update() function, the IP stack is more responsive to ICMP requests etc.

    The new examples included with my branch of the library clearly demonstrate some of the issues I encountered when attempting to create a simple web client and/or web server. The first issue I noticed involved the device crashing or stalling, and then failing to reconnect or respond to pings. Testing indicated that the hardware itself was still responding and receving packets, so the issue seemed to be software based. These issues mostly seem to be addressed in the fix_errata12 branch, but testing via large dowloads from a web server indicated there were still some remaining issues, mostly surrounding data corruption and flow control.

    Most of the remaining changes attempt to address issues with corrupted or out of sequence data, and to manage the flow of data better. In some situations, for example, web servers will send TCP payloads equal in size to 1/2 of the TCP Max Segment Size (MSS) which causes problems with flow control. The IP stack will now only close the TCP window if data is being received fast enought to do so, which appears to reduce issues with these transfers. The main issues come when a sending device sends only 1/2 MSS, and the recipient closes the window. The library will now count individual bytes in memory vs packets with data in them, and only close the TCP window if the assigned data buffers are completely full.

    Testing has been very successful, with the device demonstrating full functionality for extended periods of time, downloading 70+MB of data without any errors detected in the data or hardware. The new web server examples and HttpClientTest.ino example seem to be good displays of the current capabilities and error free operation, and can be used to demonstrate the issues, when used with the original library code, or when changes are reverted.

    Summary:
     
    The mini ENC28J60 modules are an inexpensive and effective way to add internet connectivity to any Arduino project, and their size make them very suitable for use with Arduino.

    I found the hardware itself to be very reliable and easy to use, although there seemed to be a few minor issues with the related Arduino library (UIPEthernet) that was tested.
    As noted, I have submitted some workarounds/fixes for review and possible integration into the main library at the time of this post, so users are encouraged to use the library linked above.

    ICStation.com:

    A big thank you to www.ICStation.com for sending me this product, as well as being very patient.

    It has been a number of months since I actually received it, but their small contribution has lead to the creation of the RF24Ethernet TCP/IP Radio Network library, and some potential improvements to the UIPEthernet library. A wealth of Arduino and Raspberry Pi related products, gizmos and devices are available on their website, and their staff seem very friendly.


    RF24Ethernet - For DIY Internet of Things and Home Sensor Networks
    Adding internet connectivity to RF24Networks using nrf24l01+ modules as ethernet cards

    RF24Ethernet, What is it and how does it work?

    For anybody not familiar with my blog, I have done a lot of recent work in improving the radio driver and related network library for NRF24L01+ radio modules, using Arduino and Raspberry Pi or using two or more Arduinos. These very inexpensive and feature-rich devices can be used to create your own home sensor network, with very little cost when compared to most available solutions.

    RF24Ethernet will allow you to use a Raspberry Pi or Arduino as the 'gateway' machine to your network, and lets you connect to your sensors directly, using any device that has a web-browser, whether it is an iPod, PC, etc. or your sensors can connect out to the internet for information.

    Current Libraries:
    RF24 - OSI Layer 2 radio driver for nrf24l01+ modules
    RF24Network - OSI Layer 3 network driver for RF24
    RF24Ethernet - OSI Layer 4 Protocol (TCP/IP) driver for RF24Network
    RF24Mesh - Mesh networking layer for RF24Network (Dynamic config and topology)

    How it works: (Updated)

    The RF24Ethernet library is currently in the testing phase, and uses the UIP TCP/IP stack.
    The library has been modelled after the Arduino Ethernet library, allowing users to create web enabled, wireless devices, without having to learn the RF24 or RF24Network APIs. The addition of a real protocol (TCP) on top of RF24Network provides a level of simplicity, consistency and reliability beyond what was previously possible.

    The IP address of each node needs to be statically assigned. Translation between RF24/RF24Network (MAC) addresses and IP addresses is handled in one of two ways, depending on the configuration. The default configuration uses ARP requests to find the correct node when TCP data is incoming, and users can optionally utilize RF24Mesh to provide MAC/IP translation and/or dynamic address assignment at the network layer.

    Configuration/Testing: (Updated)

    Configuration is now integrated directly into RF24Ethernet, with the RF24Network address specified as the MAC address, and this can be further automated by utilizing the RF24Mesh layer along with RF24Ethernet. Users have the option of creating a static network, or utilizing RF24Mesh to create a dynamic network with nodes capable of moving around physically or utilizing fail-over nodes. The RF24toTUN application running on a Raspberry Pi automatically performs discovery and routing for incoming TCP/IP data, so users only have to configure static IP addresses, and a unique identifier for each node when used with RF24Mesh.

    Setup (Arduino & RPi):
     RPi:
      Install RF24, RF24Network, RF24Mesh & RF24toTUN libraries
      Note: RF24toTUN requires the boost libraries. Run sudo apt-get install libboost1.50-all 
      a: wget http://tmrh20.github.io/RF24Installer/RPi/install.sh
      b: chmod +x install.sh
      c: ./install.sh  (Note: This should be run without sudo or all your base files will belong to root)
    Arduino:
     a:  Install RF24 lib
      c: Install RF24Ethernet library
      d: If using with a RPi, run any of the Getting_Started examples. You should be able to ping and connect to the remote Arduino.
      e: If using with a SLIP interface (non-RPi) :
          1. Run the  SLIP_Gateway.ino example on the Arduino connected to the PC/MAC etc
          2. Run the SLIP_InteractiveServer.ino example on another Arduino.
          3. Once the SLIP interface is configured as per the examples, you should be able to ping and connect to the remote Arduino.


     RF24Ethernet - Setup, config and demo
    The initial proof of concept interface borrowed directly from the SerialIP library, using the uIP TCP/IP stack and uIP proto-sockets/proto-threads. Since testing was very succesful, the library has been developed to provide a simpler user interface, very similar to the Arduino Ethernet library. In its current form, a node running RF24Ethernet can act as a standard TCP server, and can function as a telnet or web server, by modifying the included example.

    How can this be used?

    The possibilities from here are virtually endless, with very inexpensive sensor networks being provided with direct TCP/IP connectivity. One of the more obvious applications involves simple retrieval of information from network or internet sources, such as the time or the current weather. Controlling a connected LED or other attached device can be as simple as opening a bookmark in your browser.
     
    To take things a whole lot further, this could even allow RF24Network to be utilized as a bridge betwen LANs, using sensor networks for emergency commuinications etc, when main connections are down. Testing shows that speeds  across the network are slightly better than or equivalent to a dial-up connection, so it seems to provide a practical solution for low-speed data transfers like sensor data, text-based email or chat.

    Results of Testing:

    The above picture presents an idea of the latency, etc when sending ping requests of varying sizes from the RPi master node to a connected sensor node.

    Documentation/Further Development?
    See http://tmrh20.github.io/RF24Ethernet for available documentation.

    Update Nov24:
    Working with UIP TCP/IP stack has been a bit of a challenge to say the least, but things seem to be coming along nicely. The RF24toTUN library has been updated to route payloads according to the radio MAC address, so integration with RF24Network is coming along nicely. Support for the RPi to send fragmented multicast payloads has been added, so ARP requests are working nicely within RF24Network. This will allow full integration with RF24Mesh, to create a dynamic TCP/IP mesh sensor network if desired, with very little to no configuration needed by the user. I've commited the current code to a new branch (master_dev) to hold the new code until it is cleaned up and more functionality is added. Currently, it only supports incoming data connections as a simple server, and ICMP packets.

    Update Nov30:
    The Server and Client API to match the official Ethernet library is now in place and working for the most part. DHCP, DNS lookups and UDP in generall is not developed yet. There are still some bugs and oddities to work out, but overall, the TCP server and client seem to perform fairly well given the circumstances. Web client and server examples have been included.

    Update Dec 7:
    The library seems to be working very well now, and the API is about 95% complete. Most bugs have been addressed, with only a few minor issues left, generally surrounding timeouts during very large data transfers. The existing examples have been updated, and some new examples have been added, demonstrating a simple web server and interaction with a sensor node via a web browser. Some documentation has also been created and is linked below.

    Update Dec9:
    RF24Mesh has been integrated with RF24toTUN, to provide automated addressing and mesh support for RF24Ethernet. When building RF24toTUN, use 'sudo make install MESH=1' to compile with RF24Mesh support. If using with RF24Ethernet, see the new SimpleServer_Mesh.ino example for usage. An install script has also been created for RPi, to simplify installation of the various libraries.

    Update Dec 14:
    Updated RF24Ethernet to support SLIP or TUN devices as well. This requires RF24Mesh to perform MAC/IP translation. Two new examples have been added, SLIP_Gateway.ino demonstrates how an Arduino can act as a simple USB interface to any device that supports SLIP. SLIP_InteractiveServer demonstrates how to use RF24Ethernet and RF24Mesh with a SLIP or TUN interface.

    Update Dec 28:
    Modified the MAC address format due to issues with standards when using it on RPi/Linux. Modified the timing of uip restarts. Updated RF24toTUN to provide cmd line configuration for all major options including node addressing. Fixes and updates to RF24Network and RF24toTUN seem to have addressed some buggy behaviour.

    Update Dec 30:
    Todays latest updates should be applied along with the latest updates to RF24toTUN and RF24Network. The main change fixes corrupt client requests, which would have been noticed when establishing outgoing connections. The remaining changes revolve around reliability, the order of operations, and the timing of things, and seem to really bring RF24Ethernet closer to a stable, reliable library. 
     
    Update Jan 2, 2015
    This round of updates comes after a very long round of testing and coding. The RF24 library has been updated to provide even better timing, reliability and throughput. Changes to RF24Network improve fragmentation/reassembly. RF24toTUN has been updated to fully support all 3 datarates, and throughput has been improved for all speeds. RF24Ethernet has been updated to provide a timeout for connections, part of better handling for TCP window reopening and failures, and allows users to configure the periodic timer via uip-conf.h to provide faster transfers. These changes bring RF24Ethernet a lot closer to a stable release. Testing shows that these updates provide easily noticeable increases in reliability and speed at all levels, and updating all the mentioned libraries is recommended.

    Update Jan 4, 2015
    Added connection timeouts to recover from hangs during failed client donwloads, which adds improved reliability to the library. Added better TCP window management to prevent those hangs during client downloads, along with configuration options. Documentation updated to include new features and options.

    Update Jan 16, 2015
    Updated to v1.2b - Adds UDP and DNS support along with a pile of fixes and updates. Users should update RF24Network and RF24toTUN along with RF24Ethernet. This will be the final update to this blog post. See the documenation below or check back here at tmrh20.blogspot.com for additional posts.

    See https://github.com/TMRh20 for all related code/library downloads, and http://nrf24.github.io/RF24Ethernet for available documentation.


    Creating a Customized Zephyr Project + Arduino core

     Creating a Customized Zephyr Project + Arduino core Working outside them boxes   I currently have 2 Arduino Uno Q boards in my possession, ...