Showing posts with label nrf52840. Show all posts

Friday

Initial Testing, Notes & Progress on new PCB for Wireless Audio Prototyping

 Initial Testing, Notes & Progress on new PCB for Wireless Audio Prototyping

 Testing out the new circuit boards and getting the built-in microphone working

 If you weren't following along I just received some new custom built circuit boards from PCBWay.com and have been testing things out extensively. Everything works! I even got the custom-added I2S microphone working with the nRF52840.

The boards support functionality like voice transmission over the built-in radio, and can function as a radio, intercom or simple music player etc. 


                                            A full test of the new circuit boards

Getting the Microphone working with the AutoAnalogAudio library: 

The nRF52840 Feather Express/Sense does have an I2S interface, but it only supports up to a 24-bit window, whereas the SPH0645LM4H expects 32 SCK pulses per audio frame (18 bits of data + 14 bits of padding) and a 64 x BCK signal, where the nRF52840 typically does a 48 x BCK signal.

After a bit of searching, I found that the appropriate signal could be created by the PWM peripheral of the 52840, and the I2S interface would just need to be configured with special settings to grab the 18-bits of data properly.

The main drawback with using this mode is the I2S interface can only operate in either Input or Output mode, they can't be run at the same time unless both I2S Input & Output devices use the same settings. I had to make some modifications to the AutoAnalogAudio library, released in v1.54.0, in order to allow switching between I2S modes.

Currently, this mode is only supported for input devices. 

                                                                The Feather Express 52840 

Configuration for the Microphone: 

To use the new special settings, users need to set the aaAudio.manualI2S variable to True before calling the aaAudio.begin(2,0); function.

With the Feather Express, the LRCK or WS pin needs to be configured from the default of 29, to something like 28, which is A3 on the Feather Express 52840

Results: 

 I've put together a full Radio Transceiver example for this PCB, found at https://github.com/TMRh20/FeatherAudio/tree/main/Examples/I2S_TransmitterAndReceiver

In order to use the example, upload to two Feather 52840 Express or Sense boards, and plug them into the custom PCB, or manually attach external I2S microphone & amplifier.  

The example features 3 buttons, the PTT button is used to transmit, then there are two for Volume Up/Down. If users press and hold Volume Down, then Press Volume Up, the device will go into a continuous transmission mode, not requiring the PTT button to be pressed.

The device also toggles the onboard red LED when data is received.

 Audio is relatively high quality at 16-bits and 32kHz, so it is pretty clear and useful for many different applications.


Thursday

Recreating nRF24 greater than 32 byte payload issue with nRF52840

 Recreating nRF24 greater than 32-byte payload issue with nRF52840

A D.O.S. attack against nRF24L01P that do not validate Dynamic Payload Sizes

 I made a video demonstrating how to send 33 byte payloads to the nRF24L01P and either cause the device to flush its RX buffer, or create a denial of service attack for any devices that do not validate Dynamic Payload sizes.


I find it interesting that the nRF24L01P devices accept these payloads at all, as well as sending an ACK to the transmitting device.


The nrf_to_nrf Library: Recent Updates & Changes

 The nrf_to_nrf Library: Recent Updates & Changes

Power Management and Encryption

 I've made some somewhat significant changes to the nrf_to_nrf library recently. This lib allows NRF52x based devices to communicate with each other and NRF24 based devices. 

Power Management:

The NRF52x devices are low power devices, capable of utilizing very little power when all the peripherals are disabled. There was an issue brought to my attention by a user, identifying that the radios were making use of the HF Clock, Random Number Generator, CCM Encryption peripherals and that the hardware was being enabled in the constructor instead of the begin() function. 

I was able to modify the library so that the required peripherals are en/disabled only as required and on calls to powerUp() and powerDown() functions. Users need to keep this in mind, since there may be other needs for these peripherals, which may need to be re-enabled after powering down the radio.

This is fixed in the latest release v1.2.14

Authentication & Encryption:

NRF52x devices may also have a CCM mode encryption capability built in. If so, it was not being configured correctly, and the MAC/MIC verification was actually failing prior to recent updates. Changes were made to correctly copy the MAC/MIC to the receive buffer & the modes are now set prior to encryption/decryption to ensure proper MAC/MIC integrity. A verification is also performed after decryption to ensure the integrity of the MAC/MIC. 

This will be fixed in the next release and is available in the source code on GitHub.


Saturday

AutoAnalogAudio: Decoding and playing MP3 files direct from SD card on nRF52

AutoAnalogAudio: Decoding and playing MP3 files direct from SD card on nRF52

Having fun with nRF52840 devices

I've been playing around quite a bit with my AnalogAudioAudio library since I got it working with I2S, including creating a simple Bluetooth controlled audio player.

Today, I found a simple MP3 decoding library, and decided to test it out. It actually worked! Now I have mp3 files being decoded directly from SD card on nRF52 devices like the Adafruit Feather 52840 or XIAO BLE Sense 52840.

There is lag of a few seconds prior to playback starting, but once that takes place, it seems to play the files well. The code I am using is still in prototyping stages but it does function!


I had to edit an existing MP3 decoding library a bit, but the current code I am using is at https://github.com/TMRh20/microDecoder

Any users that want to test it out can install directly from ZIP from this repository.

I would recommend testing the AutoAnalogAudio library with WAV files before venturing into MP3 playback, but to each his own...

Some example code using the above library is shown below. It has some bugs & quirks, but it does function.

#include <SD.h>
#include <AutoAnalogAudio.h>
#include "mp3.h"  // decoder
#include "pcm.h"

mp3 MP3;
pcm audio;
AutoAnalog aaAudio;


/************ USER CONFIGURATION ***************/
const char* audioFilename = "noceil.mp3";
uint8_t SD_CS_PIN = 2;                      // Set this to your CS pin for the SD card/module

float volumeControl = 0.2;
#define AUDIO_BUFFER_SIZE 1600  // Should be a multiple of 64
/**********************************************/

void setup() {

  Serial.begin(115200);
  while (!Serial) delay(10);

  Serial.print("Init SD card...");
  if (!SD.begin(SD_CS_PIN)) {
    Serial.println("init failed!");
    return;
  }
  Serial.println("SD init ok");

  //aaAudio.I2S_PIN_LRCK = 28;  // Use different LRCK pin for Feather Express 52840
  aaAudio.maxBufferSize = AUDIO_BUFFER_SIZE;
  aaAudio.begin(0,2);

  playAudio(audioFilename);
}

void loop() {
 
  loadBuffer();

  // Control via Serial for testing
  if (Serial.available()) {
    char c = Serial.read();
    if (c == '=') {
      volumeControl += 0.1;
    } else if (c == '-') {
      volumeControl -= 0.1;
      volumeControl = max(0.0, volumeControl);
    } else if (c == 'p') {
      playAudio("waitress.mp3");
    } else if( c == 'c') {
      playAudio("noceil.mp3");
    }
    Serial.println(volumeControl);
  }

}


File myFile;

void playAudio(const char* audioFile) {

  if (myFile) {
    myFile.close();
    MP3.end();
  }

  memset(aaAudio.dacBuffer16,0,sizeof(aaAudio.dacBuffer16));
  aaAudio.feedDAC(0, 64);

  //Open the designated file
  myFile = SD.open(audioFile);

  MP3.begin(myFile);
  MP3.getMetadata();
  aaAudio.setSampleRate(MP3.Fs, 1);
  Serial.println(MP3.Fs);
  aaAudio.dacBitsPerSample = MP3.bitsPerSample;
  Serial.println(MP3.bitsPerSample);
}

void loadBuffer() {

  uint32_t sampleCounter = 0;
  if (myFile.available() >= AUDIO_BUFFER_SIZE) {
    for (uint32_t i = 0; i < AUDIO_BUFFER_SIZE/64; i++) {
      audio = MP3.decode();
      memcpy(&aaAudio.dacBuffer16[sampleCounter], audio.interleaved, 128);  // 128 bytes
      sampleCounter += 64;                                                  // 64 samples per go
    }
    for (uint32_t i = 0; i < AUDIO_BUFFER_SIZE; i++) {
      int16_t sample = aaAudio.dacBuffer16[i];
      sample *= volumeControl;
      aaAudio.dacBuffer16[i] = sample;
    }
    aaAudio.feedDAC(0, sampleCounter);
  } else {
    myFile.seek(0);
  }
}


Thursday

Encrypted Audio Comms with XIAO 52840 Sense

Encrypted Audio Comms with XIAO 52840 Sense
The beginnings of wireless audio comms


I've been playing around with the NRF52840 boards I have, and now that I have basic audio functionality working via PDM microphone and PWM audio output, the next thing to do is test out an encrypted wireless communication scenario, so that's what I've done.

The devices use the AutoAnalogAudio and nrf_to_nrf libraries created by me to communicate wirelessly. I've also enabled encryption at the nrf_to_nrf layer, and the related code is an example of implementation, with the device randomly generating a new key and re-keying every 30 seconds. This will prevent others from decrypting the payloads or performing replay attacks outside the 30-second windows. 

This means that users would need to start the devices at the same time (within a 30-second window), so they start-up using the same key. After 30-seconds, a new key is generated and configured, so both devices will then use the same new key. The receiving device ensures that the old key matches before accepting the new key, so unauthorized users can't simply send a new key or replay an old key. Any power down of either device will result in lost communication unless the other device is restarted within the same 30-second window.

To use the sketches (posted lower down), users would need a XIAO 52840 Sense board and both of the aforementioned libraries installed, then just run the code. No wires to connect, no power supply issues to worry about, no counterfeit nrf24 devices to worry about, just a straightforward device that works.

There are still a few issues with synchronization of the audio vs how the device handles PWM data. Essentially, you can have the PWM pin default to a LOW or HIGH state when the current PWM sequence ends, which happens during radio communication when packets are lost or slow to transmit. Compared to other devices I've worked with, which maintain the current state of the pin when PWM or DAC data ends, this device will revert the pin to either HIGH or LOW which causes a popping or clicking sound. 

I'm not sure how to work around this currently, but will continue to experiment to try and achieve better results. In the mean-time users can try out the prototype code by downloading the sketches here: https://github.com/TMRh20/Sketches/tree/master/XIAO-EncryptedAudio

Sunday

NRF52840 and Arduino: Encrypted and Authenticated Radio Mesh Networks

 NRF52840 and Arduino: 

Encrypted and Authenticated Radio Mesh Networks

In a recent post, I mentioned using the on-board encryption module of the NRF52840, and I've made some decent headway so far! I've finally gotten my encrypted driver working with RF24Network and RF24Mesh and am pretty happy with the results. 

One of the nicest parts of this is it doesn't add any overhead to RF24Network or RF24Mesh itself, since the encryption is incorporated at OSI layer 2. This means that when we transmit a 32-byte payload with RF24Network or RF24Mesh, all those layers see is the unencrypted data. The radio at layer 2 will add some data onto each payload and encrypt it, then decrypt it and present the unencrypted data to the higher layers.

For example, the current overhead of this implementation for encryption is 12-bytes. A 5-byte Initialization Vector (IV), a 4-byte Message Authentication Code (MAC) and a 3-byte packet counter. The radio driver adds this data on in the background, so if you have a 24-byte payload to send, RF24Network adds on its 8-byte header and the 32-bytes of data is sent to the radio driver. The radio driver will then encrypt the data, send an actual 44 bytes of data over-the-air, then decrypt it and present 32-bytes of data back to the RF24Network layer.

Tip: If using this library with the RF24Network or RF24Mesh layers, open RF24Network.h and set the MAX_FRAME_SIZE to 111. Then, per the included examples, the higher layers will handle the larger packet sizes that the NRF52840 is capable of. Make sure to set it back to 32 for communication with nrf24 devices.

There are still a number of questions I have regarding this implementation, but in any case, the library is functional, but don't quite expect full security just yet. There are a number of things to be investigated and worked out regarding how exactly this CCM module is supposed to be driven.

Another thing that is intriguing here is the break from the OSI model, since encryption is typically defined to be implemented at the presentation layer, way high up on the stack. I don't know why, but it feels like a better opportunity to encrypt as much of the data as possible, publicly transmitting only what absolutely needs to be public information. The design of the RF24 communication stack generally follows the OSI model, so the hope is that this will make up for a lack of presentation layer moving forward. It looks like some tasks can still be left up to the presentation layer, like rekeying and managing timestamps to prevent things like replay attacks.

The library with encryption enabled has now been released, get it via Platform IO, Arduino Library Manager or directly from GitHub for the latest changes. Note that Platform IO will install the proper RF24Network and RF24Mesh dependencies, while Arduino Users would need to install the separate RF24Network and RF24Mesh branches manually for now.


Saturday

AutoAnalogAudio Arduino Library: Updated with recording support for XIAO Sense via PDM

 AutoAnalogAudio Arduino Library

Updated with recording support for XIAO BLE SENSE - NRF52840 via PDM microphone

Its been a while since I received my first NRF52840 device, and I finally got around to publishing what I have so far with the AAAudio libray. The XIAO Sense board that I have has a built in PDM microphone, so I managed to get it working with AAAudio. The results are pretty good, I tested it as a wireless microphone and it seems to hold up well. This is all kind of preliminary, full functionality isn't quite there yet, but it does function.

I've struggled with getting I2S output to work so far, but eventually I should be able to figure it out. There seems to be some sort of problem with it, I would like to blame the board and say it just won't work properly, but there is probably something I'm missing in the code.

In any case, the library has been updated, but it will probably be a while before I do an official release, so users will have to get the source code directly from GitHub.

https://github.com/TMRh20/AutoAnalogAudio/archive/refs/heads/master.zip


Wednesday

NRF52840 to NRF24L01+ Wireless Communication with Arduino

 NRF52840 to NRF24L01+ Wireless Communication with Arduino

More on development of the nrf_to_nrf radio driver

So I've finally made some more progress on the development of the nrf_to_nrf radio driver that allows communication between NRF52840 and NRF24L01+ devices. The main and latest development is the functionality of using static payloads. I'd been playing around here and there for a few months trying to figure out why the ACKs kept getting rejected when using static payloads, since I had the driver working with dynamic payloads and even ACK payloads. It turns out the NRF24 devices will only send and receive ACK packets that have a payload size of 0 when using static payloads. The driver actually needs to set the payload size to 0 then switch back after sending/receiving ACKs. I should have guessed, but didn't figure it out for quite a while.

It's been quite interesting so far, this radio will handle payloads up to 127-bytes compared to the 32-bytes of the NRF24, and supports 8 'pipes' (for addressing) rather than 6. It still has a similar method of addressing, which many people seem to find confusing. It also can measure the RSSI and return a value rather than the NRF24 functionality of returning on any value better than -64 dBm. 

The main "downfall" is that the radio is software driven, unlike the NRF24, which handles a lot of functionality independent of the MCU, but that downfall on the other hand gives us direct access to the radio and its functionality. This opens things up a bit for what is possible with the radio. In order to achieve functionality similar to the NRF24 however, interrupts need to be used to handle radio events in the background, while the main software runs. This may prove to be something I'm not going to support, but will see how things develop with the Arduino platform and NRF52 board support.

Another interesting capability of this device is encryption. It contains a CCM - AES CCM mode encryption peripheral, that allows us to create encrypted and authenticated networks. I've been playing around with this functionality lately, and it looks like it can be incorporated into the library in a fairly seamless way. More on this later...

The library is currently available via the Arduino Library Manager, PlatformIO or you can grab it at GitHub if you want the latest modifications.


Saturday

XIAO BLE Sense: More with nrf24L01+ communication

 XIAO BLE Sense: More with nrf24L01+ communication

Emulating the Enhanced Shock-Burst Protocol

So its been a little while since I received a BLE Sense board based on the NRF52840 from https://www.seeedstudio.com/ and man oh man it has taken up a lot of my time. This is one of my favorite hobbies, so creating a library for ESB communication with nrf24 modules has been quite a lot of fun!

The radio works with logical pipes and defined radio addresses, just like the NRF24L01 and interaction with it is not as complicated as it could be. Getting the ESB protocol working has been a bit tougher than I originally thought it would be though.


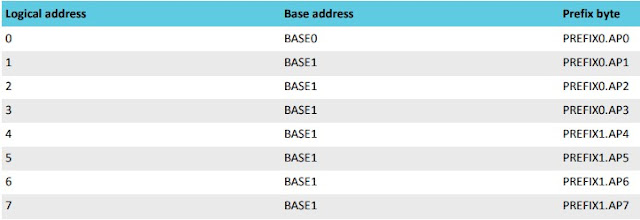
As shown in the image above, pipe or logical address 0 can have a unique address, but pipes 1 through 7 must share a base address, very similar to the 24l01.


It seems that the radio must be disabled when switching between TX and RX states, it took me a while to figure this out programmatically, until I noticed this in the datasheet. 

Interestingly enough, the new, enhanced RF52840 does not implement any internal protocols, ESB must be entirely handled via software.

I have my nrf_to_nrf radio driver up and working now with many radio features. It allows users to use the API from the RF24 library to interact with the radio. I am having problems getting static payloads to transfer correctly, but simply enabling the dynamic payload feature enables the RF24 examples to function correctly, and it works with the rest of the RF24 communication stack, the different layers will need to be updated to accept the new library.

The nrf_to_nrf library only has a single-layer buffer at the moment, but it shouldn't be too difficult to implement a 3 layer FIFO like the nrf24s have. It would be helpful if I could drive the radio via IRQs but so far I haven't had any luck with IRQ handling. My cohort in RF24 programming is working on an alternative layer that uses code from the NRF52 SDK, but we might need to have IRQ handling running for that to be a viable option. We will see, the NRF24Network and higher layers have had adjustments made to allow the new library to work. Users can manually install from source until a new release is made to the libraries, which will update via the Arduino Library Manager.

Thanks again to Seeed Studio for sending me this device, new hardware is always fun to play with!

Sunday

XIAO BLE SENSE: nrf52840 radio communication with nrf24L01+

XIAO BLE SENSE: nrf52840 radio communication with nrf24L01+

Establishing a communication layer using the RF24 API 

I recently received an XIAO BLE Sense board from https://www.seeedstudio.com/ based on the nrf52840 and have been playing around with it for a few days now. In that time I have been able to get audio recording working with my AutoAnalogAudio library, as well as establish basic radio communication with the nrf24l01+ modules. This thing is pretty sweet! It is very small, so I've been leaving it connected to the USB cable so I don't lose it, but its definitely a benefit.

One of the first things to know about this board is that it has a DFU functionality, so it switches ports while uploading, and goes back to the original port after uploading. This means that if you upload some code that crashes the device, you need to press the reset button twice quickly, and it will reaload into DFU mode on a different port, so you can re-upload some working code.

Secondly, if you get an error 'Property 'upload.tool.' is undefined' then you just need to select the correct upload port.

It also uses a USB-C connector, so make sure to have the correct cable handy.

Radio Communication:

To get radio communication working, I've written an Arduino library for the nrf52840 which can be found here: https://github.com/TMRh20/nrf_to_nrf It can be installed just like any other Arduino library.

The library includes one example for now, gettingStarted. To get this example working with the Arduino example from the RF24 library, the following parameters need to be set in the RF24 example:

  1. Call radio.enableDynamicPayloads();
As of this writing, the library only supports reception, and there is no Auto-Ack functionality yet. This is just a preliminary draft of the API.

So far I am very intrigued with this device and its capabilities. Hopefully it isn't too much to get transmission and auto-ack working, but we will see I guess.


My Custom Zephyr + Arduino Build for Arduino Uno Q: Adding Zephyr Networking to the Mix

 My Custom Zephyr + Arduino Build for Arduino Uno Q: Adding Zephyr Networking to the Mix Using RF24Ethernet with native Zephyr networking  F...