Showing posts with label pwm. Show all posts

Tuesday

AutoAnalogAudio Library: New examples for nRF52x including a BLE controlled Audio Player

 AutoAnalogAudio Library Updates for nRF52x:

 New examples for nRF52x & a BLE controlled Audio Player

With recent updates to the AutoAnalogAudio library, I've been able to put together a bunch of examples specific to the nRF52x platforms. The examples range from examples that use the onboard PDM microphone capabilities and either an I2S or Analog (PWM output) amplifier to a BLE controlled Audio Player.


The examples also demonstrate usage of the radio capabilities as well, using the radio either at a low level (nrf_to_nrf library), capable of streaming very high-quality audio or using BLE control to playback audio from SD card. 

When recording via PDM and either re-playing to an amplifier or broadcasting via radio, fairly high sample-rates can be used along with 16-bit modes, making for very decent quality wireless audio. There are some limitations when reading from SD card, as it seems the max SPI speed on these devices isn't that fast, so users need to play around with sample rates, stereo/mono modes and 8 or 16-bit samples.
Once the AutoAnalogAudio library is installed, the nRF52x examples can be found in Arduino examples under AutoAnalogAudio/Platforms/NRF52

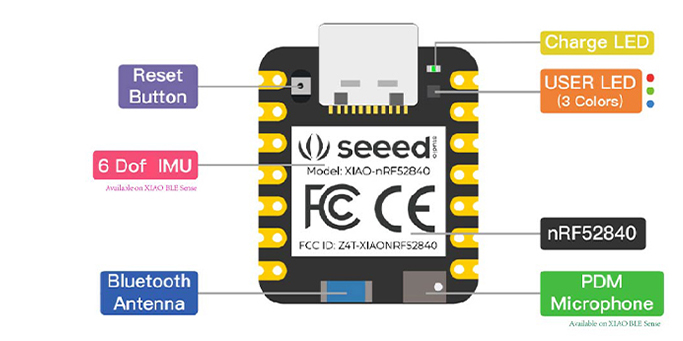
XIAO BLE Sense 52840 used for testing


The BLE controlled audio player uses a bunch of different peripherals and pushes the capabilities of the device a bit, but it seems to work great. I've created another example using the Adafruit Bluefruit library as well, which supports faster SD reading & higher quality playback, which I will also include in the library soon. 

Here is the current code using the standard Arduino BLE library:

/* Arduino BLE control
led Audio Player for nRF52

 *
 * This is an example of me playing around with BLE control and different
 * services/characteristics to test the AutoAnalogAudio library.
 *
 * Requirements:
 * 1. nRF52 Device (Tested on nRF52840)
*  2. SD Card with WAV files: 8-bit, 16-24kHz, Mono
 * 3. I2S or Analog Amplifier + Speaker connected
 * 4. Mobile device or 'other' with nRF Connect installed
 *
 * Connect via nRF Connect App:
 * 1. Device should come up as BLE Audio Player
 * 2. You should see:
 *   a: Common Audio
*    b: Audio Input Type:
      Send a UTF-8 String to play a file: myfileDirectory/myfilename.wav
 *   c: Audio Input Control Point:
      Send an Unsigned value between 0-10 to set the volume low-high
 */


#include <SPI.h>
#include <SD.h>
#include <ArduinoBLE.h>
#include <AutoAnalogAudio.h>

AutoAnalog aaAudio;

/************** USER CONFIG ***********/
// File to play on startup
const char* audioFilename = "far8b16k.wav";  // 8-bit @ 24kHz audio is the max over SD card while BLE is running
uint8_t SD_CS_PIN = 2;                       // Set this to your CS pin for the SD card/module
#define USE_I2S 1                            // Set this to 0 for analog (PWM) audio output instead of I2S

/*********************************************************/
/* Tested with MAX98357A I2S breakout
/* BCLK connected to Arduino D1 (p0.03)
/* LRCK connected to Arduino D3 (p0.29)
/* DIN  connected to Arduino D5 (p0.05)
/* SD   connected to Arduino D6 (p1.11)
/*********************************************************/

#define FILENAME_BUFFER_LENGTH 64
char songName[FILENAME_BUFFER_LENGTH];
float volumeControl = 0.2;
#define AUDIO_BUFFER_SIZE 1600

BLEService audioService("1853");

// BLE Audio Charactaristic
BLECharacteristic audioDataCharacteristic("2b79", BLERead | BLEWrite | BLENotify, FILENAME_BUFFER_LENGTH);
BLEByteCharacteristic audioVolumeCharactaristic("2b7b", BLERead | BLEWrite);

void setup() {
  Serial.begin(115200);
  while (!Serial) delay(10);

  aaAudio.begin(0, 1, USE_I2S);  //Setup aaAudio using DAC and I2S or PWM

  // BLE initialization
  if (!BLE.begin()) {
    Serial.println("Starting BLE failed!");
    while (1) {};
  }

  BLE.setLocalName("BLE Audio Player");
  BLE.setAdvertisedService(audioService);

  audioService.addCharacteristic(audioDataCharacteristic);
  audioService.addCharacteristic(audioVolumeCharactaristic);
  BLE.addService(audioService);

  BLE.advertise();
  Serial.println("BLE Peripheral is now advertising");

  Serial.print("Init SD card...");
  if (!SD.begin(SD_CS_PIN)) {
    Serial.println("init failed!");
    return;
  }
  Serial.println("SD init ok");
  pinMode(6, OUTPUT);  //Connected to SD pin of MAX98357A
  digitalWrite(6, HIGH);

  playAudio(audioFilename);
}

void loop() {

  BLEDevice central = BLE.central();

  if (central) {

    if (central.connected()) {
      if (audioDataCharacteristic.written()) {
        memset(songName, 0, sizeof(songName));
        audioDataCharacteristic.readValue((uint8_t*)songName, FILENAME_BUFFER_LENGTH);
        playAudio(songName);
        Serial.println(songName);
      }
      if (audioVolumeCharactaristic.written()) {
        uint8_t vol;
        audioVolumeCharactaristic.readValue(vol);
        volumeControl = vol / 10.0;
        Serial.print("BLE Set Volume: ");
        Serial.println(volumeControl);
      }
    }
  }

  loadBuffer();

  // Control via Serial for testing
  if (Serial.available()) {
    char c = Serial.read();
    if (c == '=') {
      volumeControl += 0.1;
    } else if (c == '-') {
      volumeControl -= 0.1;
      volumeControl = max(0.0, volumeControl);
    } else if (c == 'p') {
      playAudio("brick/brick24.wav");
    }
    Serial.println(volumeControl);
  }
}

/*********************************************************/
/* A simple function to handle playing audio files
/*********************************************************/

File myFile;

void playAudio(const char* audioFile) {

  if (myFile) {
    myFile.close();
  }
  //Open the designated file
  myFile = SD.open(audioFile);

  myFile.seek(22);
  uint16_t var;
  uint32_t var2;
  myFile.read(&var, 2);   // Get channels (Stereo or Mono)
  myFile.read(&var2, 4);  // Get Sample Rate
  aaAudio.setSampleRate(var2, var - 1);

  myFile.seek(34);
  myFile.read(&var, 2);  // Get Bits Per Sample
  aaAudio.dacBitsPerSample = var;

  myFile.seek(44);  //Skip past the WAV header
}

void loadBuffer() {

  if (myFile.available()) {

    if (aaAudio.dacBitsPerSample == 8) {
      myFile.read(aaAudio.dacBuffer, AUDIO_BUFFER_SIZE);
      for (uint32_t i = 0; i < AUDIO_BUFFER_SIZE; i++) {
        aaAudio.dacBuffer[i] *= volumeControl;
      }
      aaAudio.feedDAC(0, AUDIO_BUFFER_SIZE);
    } else {
      myFile.read(aaAudio.dacBuffer16, AUDIO_BUFFER_SIZE);
      for (uint32_t i = 0; i < AUDIO_BUFFER_SIZE / 2; i++) {
        int16_t sample = aaAudio.dacBuffer16[i];
        sample *= volumeControl;
        aaAudio.dacBuffer16[i] = (uint16_t)sample;
      }
      aaAudio.feedDAC(0, AUDIO_BUFFER_SIZE / 2);
    }

  } else {
    myFile.seek(44);
  }
}


Sunday

Recording and Playback of Audio on the XIAO NRF52840 Sense - Auto Analog Audio

 Recording and Playback of Audio on the XIAO NRF52840 Sense

Auto Analog Audio Library

So I've been struggling with the I2S interface of the NRF52 devices, and have given up for the time-being trying to get it to work properly. In the meantime I've made some decent headway with the PWM interface and reproducing audio that way. This is similar to the TMRpcm library for AVR devices, which also uses Pulse-Width-Modulation to reproduce audio. 

So far the AutoAnalogAudio library is in a very basic but functional state with an included example to demonstrate how to record and playback audio on the XIAO 52840 Sense. It is designed to input audio from the PDM microphone directly and output using Pin5 of the XIAO board via PWM. The audio signal is 16-bit, 16kHz audio, so of reasonable quality, and cannot currently be modified. The code is still in its infancy.

This makes it easy to record and transmit audio over radio link, since with the nrf_to_nrf radio library, users can broadcast the audio to another device very easily. 

There are still a few problems with it, mainly some synchronization issues, which result in a clicking sound when audio is fed directly from the microphone into the PWM output (Amp & Speaker). I'm not quite sure how to resolve it currently, so will leave things as-is. Update: Adjusting the timers slightly to make the PWM a bit slower than PDM input results in a smooth output signal.

A new release will not be made for a little while, so to try it out, just install the AAAudio library directly from ZIP. See GitHub at  https://github.com/TMRh20/AutoAnalogAudio 

Saturday

New Sampling/Audio library for Arduino : AutoAnalogAudio
Easy access to the internal DAC(or PWM), ADC, Timers & DMA for sound generation

I've been playing around with the Arduino Due for a while now, and finally got to looking over the datasheet and playing around with some of the internals because of ongoing requests regarding audio functionality and advanced timer usage etc.

As a result of my dabbling, I've created a sampling library to simplify access to the onboard Analog-to-Digital (ADC), Digital-to-Analog (DAC), Timer and DMA peripherals.

It is a simplified API that allows users to create a wide range of audio or related applications in short order.

Auto Analog Audio (Automatic DAC, ADC & Timer) library

Goals:
Extremely low-latency digital audio recording, playback, communication and relaying using a simple API

Features:
  • New: Now supports AVR devices (Uno,Nano,Mega,etc)
  • Designed with low-latency radio/wireless communication in mind
  • Very simple user interface/API to Arduino DUE DAC, ADC, Timer and DMA
  • PCM/WAV Audio/Analog Data playback using Arduino Due DAC
  • PCM/WAV Audio/Analog Data recording using Arduino Due ADC
  • Onboard timers drive the DAC & ADC automatically
  • Automatic sample rate/timer adjustment based on rate of user-driven data requests/input
  • Uses DMA (Direct Memory Access) to buffer DAC & ADC data
  • ADC & DAC: 8, 10 or 12-bit sampling
  • Single channel or stereo output
  • Multi-channel ADC sampling
  • AVR devices with no DAC or DMA use pseudo DAC(PWM) & DMA(Timer + Memory Buffer)

Testing:

The results so far have been very good. Using the nrf24l01+ radio modules, I was able to stream a standard format *.wav file of high quality (48khz, 16-bit, Stereo) from a Raspberry Pi to the Arduino Due using a slightly modified version of the included Wireless Speaker example.

To put that in perspective: Data Rate = Sample Rate * Channels * BytesPerSample

Streaming over Radio (RF24):
Data Rate = 48,000 * 2 * 2 = 192.0KB/s 

Streaming from SD Card:
Data Rate = 44,100 * 2 * 1 = 88.2KB/s (maximum rate with noticeable slowdown)

Using an SD card is a bit less exciting, as the audio starts to slow down noticeably with audio of 44.1khz, 8-bit, Stereo. Unfortunately, the SD speed is currently a bit limited, since the HSMCI is not available on stock Arduino Due, and I haven't found a faster working library like sdFat for Due.

SdFat Lib:
The sdFat library works with the due, I just had to initialize it at SPI_DIV6_SPEED (10.25Mhz SPI), and it worked using a value of 5 (17mhz SPI) as well. Initial tests show the max read speeds with the stock SD library at about 113KB/s, and 182KB/s with sdFat lib. Adjusting the SdFatConfig.h file to set ARDUINO_FILE_USES_STREAM = 0 results in speeds of 204KB/s with my current card & module.

These numbers indicate that the Due can handle quite a bit of punishment, and is easily up to the task at hand. The main limitation seems to be the throughput of whatever device is providing the audio or recording it etc.

Initial testing on AVR devices seems to indicate functionality similar to my RF24Audio and TMRpcm libraries.

If using a faster device, or generating audio from tables stored in memory, it seems that the Due with the AAAudio library will most likely handle it.

Notes:

If using the RF24 library in combination with an SD card, I highly recommend using a separate SPI BUS for the radio and SD card. I experienced a number of problems with high speed transfers etc when attempting to extend the length of wires used or connect an SD card module as well.

See the SPI_UART library section of the RF24 docs to enable a secondary SPI BUS for the radio.
Due Pins - TX1: MOSI, RX1: MISO, SDA1: SCK, CS&CE: User selected


Installation: AutoAnalogAudio is available via the Arduino Library Manager


I've also included a number of examples that demonstrate usage:
Click: File -> Examples -> AutoAnalogAudio in the Arduino IDE

SDAudio Examples: Demonstrate how to play back and record WAV/PCM format audio from SD card using the AAAudio library

Wireless Examples: Demonstrate receiving and sending streams of audio data via nrf24l01+ radio modules and are easily modified to work with other radios or devices. Some matching examples and audio samples are included for Raspberry Pi.

Audio Generation Examples: Demonstrate playback of simple audio tones or synthesized audio.

ADC/Audio Capture Examples: Demonstrate how to capture data/audio streams from the ADC on one or more pins/channels.

Documentation: http://tmrh20.github.io/AutoAnalogAudio
Source Code: https://github.com/TMRh20/AutoAnalogAudio

Tuesday

 Arduino: Using the full potential of NRF24L01 radio modules
A New, Optimized Fork of the RF24 Radio Library: High speed data transfers and more!
Includes updates and new features for the RF24Network Library

Updated Jan 2015
  NRF24L01+ radio modules are very inexpensive, and provide a robust interface for transferring data wirelessly between devices with minimal resource and power consumption. I've been working with them more and more as time goes on, but have always struggled with some of the inner workings and limitations of the current libraries available.

After initially studying the operation of the radio modules and reviewing the details in the data sheet, I was convinced that the modules could perform much faster. Further research into the additional library forks, blog posts, and countless hours of testing revealed that the modules can be very sensitive to the timing of things. I also discovered a number of bugs and/or issues that would hinder performance and/or reliability. 

Initial testing proved very fruitful, with speeds maxing out the configured data-rate of the chip, and reliability was improved over previous iterations of the library. Over the course of the following year, the library has been further optimized and extended, with many new features, bug-fixes, and improved reliability and performance.

(See bottom of page for download links and documentation)

Taking Advantage of the Improvements:

From a user perspective, very little is changed from previous forks/libraries beyond the usage of the available() function. This is the main compatibility difference between this and the previous libraries. The available() function will always return 1 if data is available, to align the library with standard Arduino functions. From a technical perspective, the improvements are dramatic.

 Users will benefit from the improvements just by using the new library with old code, and some things not previously possible, can now be achieved. The included .ino examples have been configured to demonstrate 'standard' usage, but advanced users can still drive the chip outside the 'manufacturer recommended operation'

Additional functions have been added to aid in streaming or rapid-transmission situations, where 2 or more payloads are sent in rapid succession, or streamed at a high transfer rate. These include writeFast, writeBlocking, and txStandby. Use of these functions allow users to maximize throughput without overrunning the FIFO buffers. See the documentation for more info on usage. 


The addressing format has been extended to allow the use of 24,32 or 40-bit addresses, as well as defining and handling of addresses via byte arrays or integers.

For example, the following addresses are the same, and either format can be used:

uint64_t myAddress = 0x68524d5431LL;   ( Old Format   )
uint64_t myAddresses[] = { 0x68524d5431LL, 0x68524d5432LL};

byte myAddress[] = "1TMRh";                    ( New Format )
byte myAddress[] = {'1','T','M','R','h'};
byte myAddresses[][6] = {"1TMRh","2TMRh"};

Technical Info:
One of the primary factors in increasing efficiency was eliminating power ups and power downs from the general operation of the radio, which many of the existing forks already had identified. A power up takes 1.5ms or 1500us, where a transition from standby-I or standby-ii takes only 130us. In addition, leaving the CE pin high while data is written allows the possibility to have 0 delay if the TX FIFO buffer is kept busy, which this library makes use of via the writeFast() and writeBlocking() features.

This changes the operation of the radio a little bit, in that the radio needs to be powered up or powered down manually, instead of being powered down after every write.

The radio modules have shown to be very sensitive to the timing and order of operations, and many hours of testing and review have determined the optimal settings and order of operations to achieve the highest speed and reliability. Delays have been removed where possible, added where required, and minimized in every case.

As mentioned, the the available() and isAckPayloadAvailable() functions now simply check the FIFO buffer to see if a payload is available. This allowed simplification of the write() function, and should help to ensure that no packets are missed. Previous iterations used the interrupt flag, which can result in a number of issues.

The overall change in response is apparent when running example sketches like the GettingStarted_CallResponse sketch included with the library or the Transfer examples.

At this point, there are so many changes, bugfixes and details, it is best to see GitHub for all of the changes and technical info.

RF24Network: The standard RF24Network library has been updated to support the new changes, and a DEV version has implemented many new features like fragmentation/reassembly and multicast. This library is recommended if connecting any number of nodes, and provides addressing, routing, etc to help manage data in a network configuration. RF24Mesh is an overlay for RF24Network that provides automatic addrressing, and a dynamic topology for nodes running RF24Network and/or RF24Ethernet.

RF24Mesh: Automates addressing etc. for RF24Network and provides a seamless, self-healing network on top of all the layer 3 network features. 

RF24Ethernet adds a surprising level of reliability, consistency, and ease of use to nodes running RF24Network, by using standard TCP/IP networking. It uses the nrf24l01 radios as a standard Network Interface Card (NIC). It uses a Rasberry Pi or other Linux platforms as a network gateway, to allow RF24Network nodes to connect directly to web services or act as a web-server etc. Allows users to control nrf24l01 sensors or systems easily, reliably, and simply using any device with a web-browser, MQTT, etc. The API is very similar to the standard Arduino Ethernet library.

Class documentation now available here

Testing & Results:
Testing is now fully automated, with the introduction of TCP/IP support, with standard networking tools being used to test transfer speeds and reliability. Users can easily make use of the full data-rate in no-ack mode, full-duplex communication at 1MBPS with Ack-Payloads, or half-rate if using Enhanced ShockBurst (ESB). This has allowed many improvements to related libraries like RF24Network as well as the low level RF24 radio driver.

Since the initial release, many users including previous RF24 contributors have adopted the new library and provided feedback towards further improvements .See here for a demo of the initial transfer rate testing.
 
The wireless audio sketch/library that inspired these improvements is now linked below. The audio library itself is limited to around 16-20khz sample rate, which produces very reasonable sound quality for voice transmission. The limitation is due to the use of interrupts for virtually every part of the library, however, this makes it very simple to configure and use. See here for the development sketch, which was used to design the library, and is capable of higher quality audio. The wireless audio portion of the TMRpcm library has been updated to allow audio streaming and multicasting directly from SD card over RF24 modules as well.

New:
See the new store for reliable RF24 hardware and kits.

Reference Material/Libraries:

Raspberry Pi Simple Library Installer:
http://tmrh20.github.io/RF24Installer/RPi/install.sh

RF24 - Low Level Radio Driver (Generally used for device-to-device communication)
TMRh20 RF24 Fork on GitHub  - Download
RF24 Documentation 

RF24Network (Provides addressing, routing and many other features for use with multiple devices)
TMRh20 RF24Network Fork on GitHub - Download 

RF24Mesh (Dynamic 'mesh' layer for RF24Network)
RF24Mesh on GitHub - Download
Documentation

RF24Ethernet (Modelled after Arduino Ethernet API - TCP/IP over RF24Network)
RF24Ethernet on Github - Download
Documentation

RF24Audio (Digital Audio over RF24 radio modules)
RF24Audio Library

MySensors.org - Create user friendly sensor networks using RF24 radio modules

Alternative: RadioHead NRF24 Library - (Supports multiple radio devices)

NRF24L01 Data sheet
Original/Old RF24 Library by ManiacBug


My Custom Zephyr + Arduino Build for Arduino Uno Q: Adding Zephyr Networking to the Mix

 My Custom Zephyr + Arduino Build for Arduino Uno Q: Adding Zephyr Networking to the Mix Using RF24Ethernet with native Zephyr networking  F...