Saturday

XIAO BLE Sense: More with nrf24L01+ communication

 XIAO BLE Sense: More with nrf24L01+ communication

Emulating the Enhanced Shock-Burst Protocol

So its been a little while since I received a BLE Sense board based on the NRF52840 from https://www.seeedstudio.com/ and man oh man it has taken up a lot of my time. This is one of my favorite hobbies, so creating a library for ESB communication with nrf24 modules has been quite a lot of fun!

The radio works with logical pipes and defined radio addresses, just like the NRF24L01 and interaction with it is not as complicated as it could be. Getting the ESB protocol working has been a bit tougher than I originally thought it would be though.


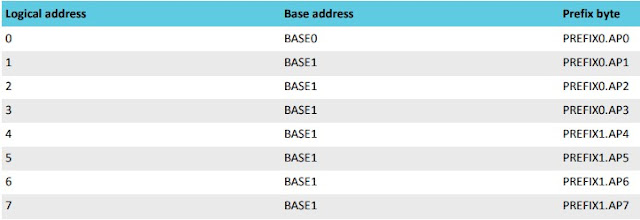
As shown in the image above, pipe or logical address 0 can have a unique address, but pipes 1 through 7 must share a base address, very similar to the 24l01.


It seems that the radio must be disabled when switching between TX and RX states, it took me a while to figure this out programmatically, until I noticed this in the datasheet. 

Interestingly enough, the new, enhanced RF52840 does not implement any internal protocols, ESB must be entirely handled via software.

I have my nrf_to_nrf radio driver up and working now with many radio features. It allows users to use the API from the RF24 library to interact with the radio. I am having problems getting static payloads to transfer correctly, but simply enabling the dynamic payload feature enables the RF24 examples to function correctly, and it works with the rest of the RF24 communication stack, the different layers will need to be updated to accept the new library.

The nrf_to_nrf library only has a single-layer buffer at the moment, but it shouldn't be too difficult to implement a 3 layer FIFO like the nrf24s have. It would be helpful if I could drive the radio via IRQs but so far I haven't had any luck with IRQ handling. My cohort in RF24 programming is working on an alternative layer that uses code from the NRF52 SDK, but we might need to have IRQ handling running for that to be a viable option. We will see, the NRF24Network and higher layers have had adjustments made to allow the new library to work. Users can manually install from source until a new release is made to the libraries, which will update via the Arduino Library Manager.

Thanks again to Seeed Studio for sending me this device, new hardware is always fun to play with!

Sunday

XIAO BLE SENSE: nrf52840 radio communication with nrf24L01+

XIAO BLE SENSE: nrf52840 radio communication with nrf24L01+

Establishing a communication layer using the RF24 API 

I recently received an XIAO BLE Sense board from https://www.seeedstudio.com/ based on the nrf52840 and have been playing around with it for a few days now. In that time I have been able to get audio recording working with my AutoAnalogAudio library, as well as establish basic radio communication with the nrf24l01+ modules. This thing is pretty sweet! It is very small, so I've been leaving it connected to the USB cable so I don't lose it, but its definitely a benefit.

One of the first things to know about this board is that it has a DFU functionality, so it switches ports while uploading, and goes back to the original port after uploading. This means that if you upload some code that crashes the device, you need to press the reset button twice quickly, and it will reaload into DFU mode on a different port, so you can re-upload some working code.

Secondly, if you get an error 'Property 'upload.tool.' is undefined' then you just need to select the correct upload port.

It also uses a USB-C connector, so make sure to have the correct cable handy.

Radio Communication:

To get radio communication working, I've written an Arduino library for the nrf52840 which can be found here: https://github.com/TMRh20/nrf_to_nrf It can be installed just like any other Arduino library.

The library includes one example for now, gettingStarted. To get this example working with the Arduino example from the RF24 library, the following parameters need to be set in the RF24 example:

  1. Call radio.enableDynamicPayloads();
As of this writing, the library only supports reception, and there is no Auto-Ack functionality yet. This is just a preliminary draft of the API.

So far I am very intrigued with this device and its capabilities. Hopefully it isn't too much to get transmission and auto-ack working, but we will see I guess.


Thursday

New Raspberry Pi + nRF24L01+ shields

 New Raspberry Pi + nRF24L01+ shields

Connect PA+LNA modules to your Raspberry Pi

I recently had some circuit boards made, as I have had enough experience working with nrf24l01 radio modules that I've encountered numerous issues regarding power supplies and the need for additional capacitors soldered to the radios. 

These boards connect to the 5v pins of the Raspberry Pi, which can supply plenty of current for the radios, and converts it down to 3.3v. I've designed two boards, one that fits inside the case, and the other that fits outside the case, so they should work with most cases, though some cases may need modifications. The designs both use a 26-pin header, so they are compatible with earlier versions of Raspberry Pi as well.

Raspberry Pi - nRF24L01+ adapters

These adapters will support even the PA+LNA versions of the radios, so you can extend the range of your wireless networks considerably over the standard modules. They include extra capacitance, with capacitors placed right beside the VCC and GND pins of the radios, so there is no need to solder on additional capacitors.

Shields are available at https://tmrautomation.myshopify.com/

Wednesday

RF24 Home Automation Kits now Available

 RF24 Home Automation Kits now Available

Comes with preconfigured devices, just plug and play!

I've finally decided to put together some electronics kits with preconfigured devices, using the RF24 communication stack. As the system is now very stable and reliable, I think it is about time I started putting devices together and selling them to support future development and designs. 

So with that, I am announcing the opening of my online store at https://tmrautomation.myshopify.com

The current kit will come with a RPi4B and all the attachments like HDMI cable, a case, and power supply along with 3 Arduino Uno R3, 2 temperature & humidity sensors and 1 RBG LED ring, plus of course the RF24 radios. I've also designed some custom PCB shields for everything to just plug into, with power for the radios and extra capacitors, so its super simple to put it all together.

The setup uses Node-Red and RF24Gateway to provide a mesh network that seamlessly links all your devices together, and allows you to add custom devices to the network and/or expand the network by purchasing more devices or setting them up yourself with the Arduino platform.

If they sell, I intend to design more devices to go with the currently available products.

Support is available at https://github.com/TMRh20/RF24-Automation-Systems/wiki

General documentation is available at: https://github.com/nRF24 and more documentation is being created to specifically support the kits.

Monday

The RF24 Communication Stack: What are the different layers and which one do I use?

 The RF24 Communication Stack:

What are the different layers and which one do I use?

Over the past number of years, I've been developing a communication stack for nrf24l01+ radios, generally to be used with Arduino and Raspberry Pi devices. The comm. stack is organized into separate layers, per the OSI model, which allows users to establish communication between any number of devices depending on their needs.


1. The RF24 layer: This layer is generally used for simple device-to-device communication, where speed and simplicity are key. One example is for radio control of a single device, where a stream of small data packets are communicated from one device directly to another in rapid succession. Streaming of audio in real-time is another example where the RF24 layer would be used directly. Using the RF24 layer can be a bit complex, and some knowledge of radio communication is beneficial.

2. The RF24Network layer: This layer expands on the RF24 layer by providing a number of features, both to enhance radio communication and provide users with the features of an OSI layer 3 (network) layer. RF24Network nodes are arranged in a static tree topology, and this layer provides all the features to manage them. RF24Network handles routing, fragmentation/reassembly of large packets, and communication to any other device is straight-forward. Users don't require knowledge of the RF24 layer to operate a network of nodes at the RF24Network layer, and it can be much simpler than using the RF24 layer directly. Recommended when not able to use the RF24Mesh library, when there is a need for static nodes, or to simplify one-to-one communication.

3. The RF24Mesh layer: This layer expands on all underlying layers by providing an automated, self-healing network that allows nodes to move around and or re-establish connectivity as required. This layer is generally recommended when creating a network of devices, as it automates addressing for RF24Network, and provides a more seamless interaction. Users generally communicate using the RF24Network API, with RF24Mesh providing address lookups and automation for the network. 

4. The RF24Ethernet/RF24Gateway layer: This layer allows communication using standard networking protocols, such as TCP, UDP, ICMP. It is generally recommended to run RF24Gateway on a Raspberry Pi as the master node, with smaller devices running RF24Ethernet. Allows very simple or very complex communication scenarios, with users requiring little to no knowledge of radio or RF24 programming APIs. 

The RF24Ethernet API is very similar to the Arduino Ethernet API, and RF24Gateway allows users to use standard networking tools to communicate with devices running RF24Ethernet. Recommended for communication scenarios where speed is not essential, but reliability and consistency is, such as a home automation system using MQTT and Node-Red and/or a sensor network reporting data. Users can run a wireless, Arduino based webserver, or interact with nodes using their mobile device over MQTT, HTTP, etc. 


As can be demonstrated, each layer has its place, providing communication capabilities for a very wide range of scenarios, and allowing users to benefit from the built-in features or to dig right in and customize things to the nth degree. Generally, the higher you go up in the stack, the simpler the interaction, with complex underlying code providing the simplest and most advanced user interaction.


Related Code and Documentation:

https://github.com/nRF24/


Auto Analog Audio & NRF52840: Now working on non-Mbed cores

 Auto Analog Audio & NRF52840: Now working on non-Mbed cores Playing around with the AAAudio library So I finally decided to make the ne...